



Table of Contents
- Why a Residential Roof Inspection Checklist Matters
- DIY Roof Inspection Safety Tips Before You Start
- Ground-Level Inspection: What to Look For
- Identifying Signs of Storm Damage on Roof Surfaces
- Attic and Interior Ventilation Checks
- How to Document Roof Damage for Insurance Claims
- Repair vs. Replacement: What Your Inspection Reveals
- Climate-Specific Maintenance and Post-Storm Protocols
Last Updated: August 21, 2026
Why a Residential Roof Inspection Checklist Matters
A residential roof inspection checklist is your first line of defense against costly water damage, structural failure, and safety hazards. Small problems, missing shingles, compromised flashing, clogged gutters, can escalate into five-figure repairs within a single season. At Rescue Roofing, we’ve seen thorough inspections catch damage before insurance claims became necessary or roofs failed entirely.
The difference between a roof lasting 20 years versus 10 often comes down to consistent, systematic inspection. This checklist walks you through exactly what to look for and what each finding means for your home’s safety and value. Regular inspections also protect your insurance coverage; insurers expect homeowners to maintain their roofs, and documentation of routine checks demonstrates responsible stewardship and strengthens claims significantly.
DIY Roof Inspection Safety Tips Before You Start
Falls from residential heights kill or seriously injure hundreds of homeowners annually (the CDC). Never inspect your roof alone. Wear rubber-soled shoes with good grip; wet or algae-covered shingles are slippery even in mild weather. Avoid inspecting after rain, frost, or snow. If your roof pitch exceeds 6:12, hire a professional, steep roofs require specialized equipment and training.
Use a sturdy ladder on level ground with someone stabilizing it from below. Never lean sideways; reposition the ladder instead. Wear a safety harness if comfortable, and consider a roof anchor point. Inspect during daylight hours. Use binoculars to examine high areas from the ground rather than climbing to them. If you feel unsafe at any point, stop and call a professional.
Ground-Level Inspection: What to Look For
The safest inspection starts from the ground, you can identify 70% of roof problems without climbing (peer-reviewed research). Stand back where you can see the entire roof profile. Use binoculars to examine the roof surface, ridge line, and edges.
Look for shingles darker than others, indicating moisture retention or algae growth. Check whether the roof surface is even or shows sagging areas, signaling structural problems or failed underlayment. Notice color consistency; significant variation might indicate patches or previous repairs. Scan for visible debris, branches, or objects on the roof surface.
Examine the roof’s perimeter for proper drip edge, metal flashing that directs water away from the fascia board. Missing or damaged drip edge is a common water intrusion point. Look at the soffit (underside of roof overhang) for water damage, staining, or rot. Discolored or soft soffit material indicates moisture problems inside.
Checking Gutters, Downspouts, and Drainage
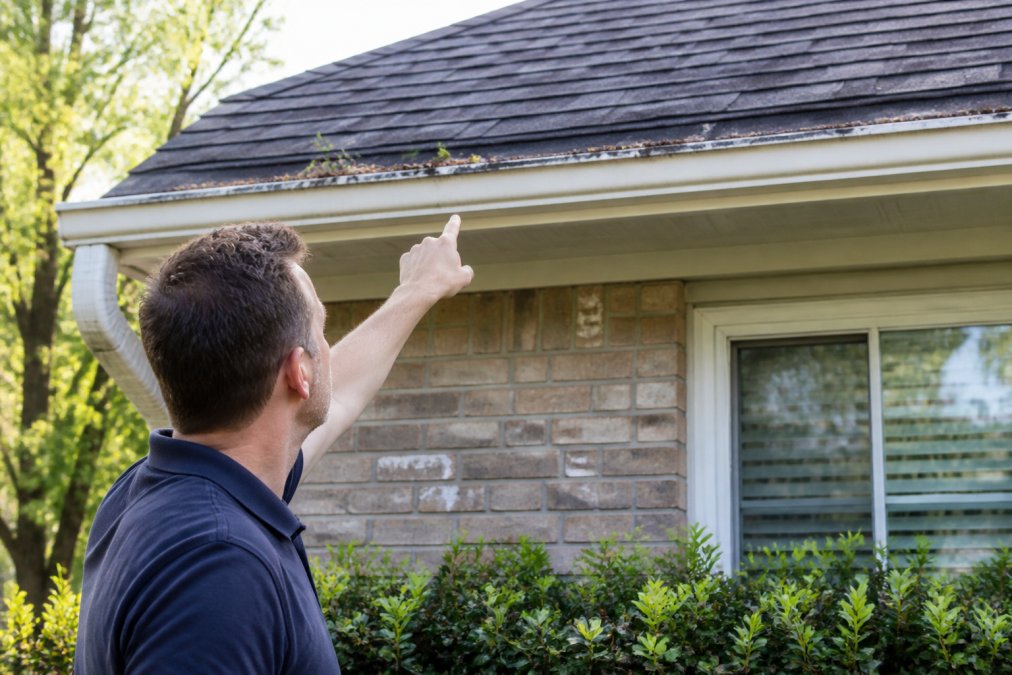
Gutters are your roof’s drainage system. Walk your property’s perimeter and look into each gutter section. Gutters should be clear of leaves, twigs, and sediment; debris blocks water flow and causes standing water, accelerating shingle deterioration and promoting ice damming in winter.
Check for sagging gutters. Properly installed gutters slope slightly toward downspouts (typically 1/4 inch per 10 feet). Sagging sections indicate loose fasteners, rotted fascia, or failed brackets. Examine downspouts and their discharge points; water should flow away from your foundation at least 4-6 feet. Downspouts discharging close to the house can cause basement moisture, foundation cracking, and erosion.
Look for rust, holes, or separation seams in metal gutters. Check for standing water after rain, indicating a drainage problem requiring correction.
Assessing Fascia, Soffit, and Visible Damage
The fascia board runs along the roof edge where gutters attach and is often the first component to show water damage. Soft, spongy, or discolored fascia indicates rot or moisture intrusion. Press gently with a tool; if it gives easily or feels hollow, the wood is compromised.
Soffit should be solid and intact. Holes, gaps, or missing sections reduce attic ventilation and allow pests and weather inside. Staining on soffit indicates roof leaks above. Check visible roof penetrations from the ground: chimneys, vent pipes, satellite dishes, and antenna mounts. Look for flashing around each penetration; this metal should be intact and sealed.
Identifying Signs of Storm Damage on Roof Surfaces
Storm damage ranges from immediately obvious to slowly emerging. After severe weather, prompt inspection can mean the difference between a covered insurance claim and an out-of-pocket repair. Documenting damage within 48 hours strengthens your insurance position significantly.
Shingle Condition and Granule Loss
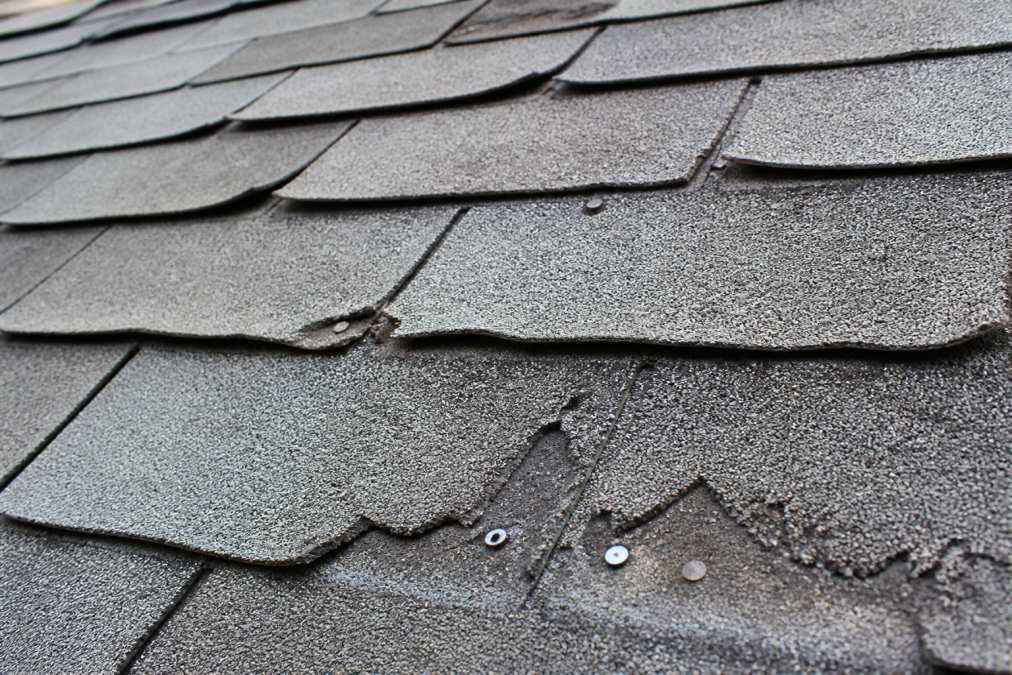
Asphalt shingles have a granular coating protecting them from UV damage. Excessive granule loss indicates accelerated aging or storm damage. After hailstorms, you’ll see bald spots where granules have been stripped away. Examine gutters and downspouts after heavy rain; granules collecting there indicate shingle deterioration.
Look for curling shingles, where edges lift away from the roof surface. Curling results from aging, inadequate ventilation, or water intrusion from below. Curled shingles expose the roof structure to water penetration. Nail pops occur when fasteners work loose and push through the shingle surface, creating holes that leak water. A few nail pops are repairable; widespread nail pops suggest the roof is near end of life.
Flashing, Valleys, and Roof Penetrations
Flashing is metal installed at roof transitions and penetrations to direct water away from vulnerable areas. Damaged, bent, or corroded flashing is a leading cause of roof leaks. Roof valleys are V-shaped channels where two roof planes meet, concentrating water flow and creating high-risk leak points. Valleys should have continuous flashing or underlayment.
Check ridge caps, the shingles covering the peak where two roof planes meet. Ridge caps should be intact and properly sealed. Examine all roof penetrations: plumbing vents, electrical vents, HVAC exhausts, and skylights. Each should be surrounded by flashing sealed to the roof surface. Gaps, cracks, or separation indicate potential leaks. drone inspection safety protocols.
Hail Damage, Wind Uplift, and Weather-Related Wear
Hail damage appears as dimples, bruises, or dents on shingles. In severe cases, hail strips granules and creates cracks. Unlike wear damage developing gradually, hail damage is sudden and concentrated. Insurance typically covers hail damage, so documenting it immediately after a storm is essential.
Wind damage manifests as lifted, torn, or missing shingles. Wind often appears in specific areas (typically roof corners and edges facing prevailing wind) rather than uniformly. Ice damming occurs when snow melts on a warm roof, then refreezes at cold eaves, trapping water behind and forcing it under shingles. Proper attic ventilation and insulation prevent ice damming. Icicles hanging from gutters or water stains on fascia in winter indicate ice damming.
Attic and Interior Ventilation Checks
Your attic’s ventilation system directly impacts roof lifespan. Poor ventilation traps heat and moisture, accelerating shingle aging and promoting mold growth. A properly ventilated attic stays closer to outdoor temperature and humidity, extending roof life by years.
Enter your attic during daylight if possible. Look for daylight through the roof, indicating holes or gaps. Check for water stains on roof decking (wood surface under shingles). Examine ventilation openings: soffit vents (under eaves) and ridge vents (along peak). These should be clear of debris, insulation, or blocking. Soffit vents should have a clear path to ridge vents for upward air circulation.
Check that attic insulation doesn’t block soffit vents; proper installation leaves 1-2 inches of clearance. Look for roof decking deterioration: soft spots, rot, or discoloration indicate moisture problems. If your attic is cold and dry with no visible problems, ventilation is working properly. If it’s warm, humid, or shows moisture signs, ventilation is failing and needs correction.
How to Document Roof Damage for Insurance Claims
Proper documentation is essential for insurance claims. Take photos and videos of all damage from multiple angles and distances. Wide shots show overall damage; close-ups show specific details. Include photos of granule loss in gutters, damaged flashing, curled or missing shingles, and water intrusion signs. Photograph a dated newspaper or calendar in the frame to establish timing.
Create a written inventory listing each damaged area, damage type, and location. Include measurements when relevant. Contact your insurance company promptly; most policies require notice within 30-60 days. Provide your documentation package immediately. When the adjuster visits, walk them through the damage and provide your photos and inventory.
Rescue Roofing assists clients with insurance documentation and communication with adjusters. We provide professional photos, written damage assessments, and estimates that support your claim.
Repair vs. Replacement: What Your Inspection Reveals
Your inspection results determine whether repair or replacement is appropriate. Repairs make sense when damage is localized and your roof has significant remaining lifespan. Replacing a few shingles or repairing flashing extends roof life economically. If your roof is 5-10 years old with minor damage, repair is typically the right choice.
Replacement becomes necessary when damage is extensive, widespread, or when your roof nears end of life (typically 20-25 years for asphalt shingles). Replacing a few shingles on a 20-year-old roof is poor economics. Consider the roof’s age; if over 15 years old, ask whether you’re investing in a roof needing replacement soon anyway. Insurance coverage affects the decision; if damage is covered, replacement might be fully or partially covered.
Rescue Roofing provides professional assessments explaining whether repair or replacement is appropriate, with aerial quotes giving accurate cost estimates for either option.
Climate-Specific Maintenance and Post-Storm Protocols
Your region’s climate creates specific roof maintenance needs. In areas with significant winter weather, ice damming prevention is critical. Ensure attic insulation meets current standards (typically R-30 to R-60) (energy.gov). Verify ventilation is clear and functional. Clean gutters thoroughly in late fall to prevent ice dam formation.
In hot, sunny climates, UV damage and thermal stress accelerate shingle aging. Ensure adequate attic ventilation to minimize heat buildup. Inspect annually for granule loss and shingle brittleness. In humid climates, algae and mold growth is common. Inspect annually for dark streaks on shingles and ensure ventilation is adequate.
After severe storms, inspect your roof within 48 hours if safe. Document visible damage with photos and contact your insurance company promptly. Post-storm inspection should focus on missing or damaged shingles, displaced flashing, debris impact damage, and water intrusion signs. Check your attic for water stains or moisture within days of a storm. Develop a seasonal maintenance schedule: spring (after winter weather), summer (after thunderstorm season), fall (before winter, clean gutters), and winter (monitor for ice damming).
A thorough residential roof inspection checklist protects your home’s safety, preserves your roof’s lifespan, and supports insurance coverage when damage occurs. Regular inspections catch problems when they’re small and manageable. Rescue Roofing provides professional inspections using accurate aerial quotes and thorough documentation. Whether you need routine maintenance or damage assessment after a storm, our team is available 24 hours to help. Call Rescue Roofing today for a comprehensive inspection and honest assessment of your roof’s condition.
Frequently Asked Questions
Q: What should be included in a residential roof inspection checklist?
A: A thorough residential roof inspection checklist should cover ground-level assessment of gutters, downspouts, fascia, and soffit; close examination of shingle condition, granule loss, and curling; inspection of flashing, valleys, and roof penetrations; attic ventilation and insulation checks; and documentation of any water intrusion, ice damming, or structural concerns. Each section helps identify current damage and predict future maintenance needs.
Q: How often should a homeowner inspect their roof?
A: Most homeowners should perform a visual inspection twice yearly, in spring and fall, plus after severe weather events like storms, hail, or high winds. Professional inspections are recommended annually for roofs over 10 years old or every 3-5 years for newer roofs in good condition. Regular inspections catch small issues before they become costly water damage or structural problems.
Q: Can I perform a roof inspection myself, or should I hire a professional?
A: You can perform a basic ground-level and interior inspection yourself by following a structured checklist and prioritizing safety. However, professional inspectors often use advanced tools to detect hidden damage you might miss. For insurance claims, storm damage assessment, or complex issues, professional inspection is strongly recommended to ensure accurate documentation and thorough evaluation.
Q: How do I document roof damage for insurance claims?
A: Photograph all damage from multiple angles in good lighting, including close-ups of affected shingles, flashing, and penetrations. Document the date, weather conditions, and any visible hail impacts or wind damage. Keep receipts for emergency repairs. Create a written summary listing each damaged area and its location on the roof. Provide this documentation to your insurance adjuster and consider hiring a professional inspector to generate a detailed damage report supporting your claim.
Q: What are the most common signs of roof damage to look for in 2026?
A: Common roof damage includes granule loss (appearing as bald spots on shingles), curling or buckling shingles, nail pops, flashing separation, moss or algae growth, water stains on ceilings or attic insulation, and signs of hail or wind damage. In areas prone to ice damming, look for ice buildup at the roof edge and water intrusion along the soffit. Storm damage often appears as punctures, missing shingles, or bent ridge caps.
Q: Does a roof inspection help with insurance claims?
A: Yes. A professional roof inspection provides documented evidence of damage, establishes when damage occurred, and creates a clear record for your insurance adjuster. Detailed photos, measurements, and expert assessment strengthen your claim and help ensure you receive fair compensation. Many insurers require professional inspection documentation for storm damage claims exceeding a certain threshold.
This article was written using GrandRanker