


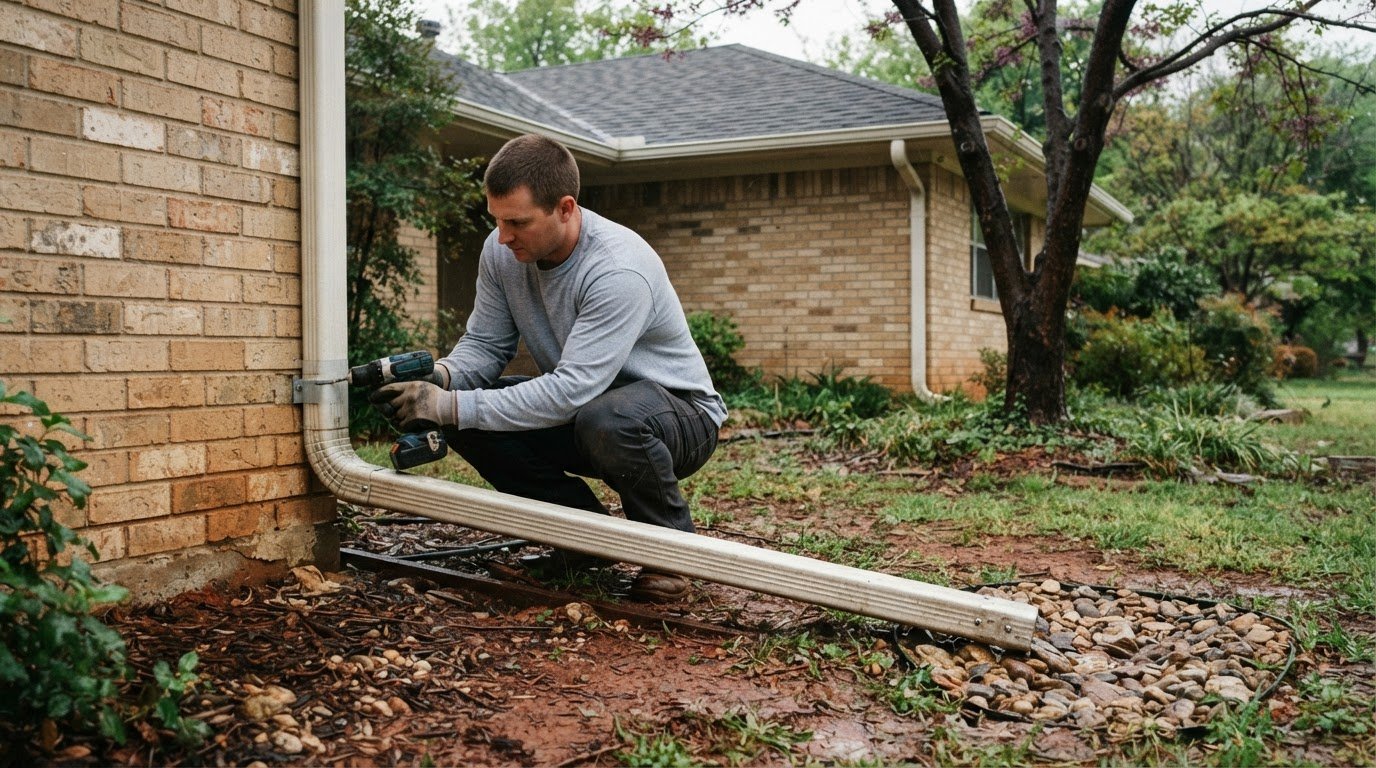

To understand how to install gutter downspout extensions, direct runoff away from the foundation and toward a suitable drainage area. Aim to discharge water 6 to 10 feet from the home, with the extension sloping away so water keeps moving. Some kits attach by hand, while others need fasteners, depending on their design.
Learning how to install gutter downspout extensions can help keep rainwater from pooling beside your home or washing away nearby soil. Whether you can fit an extension without tools depends on its connector and how securely it needs to be attached. This guide covers choosing an extension, measuring and cutting it, connecting it, and positioning its outlet. It also explains when a flexible, rigid, hinged, or buried option may suit your layout, and what to consider if water continues to pool.
Key Takeaways
- Plan the outlet so water drains away from the home, aiming for a discharge point 6 to 10 feet from the foundation.
- Choose a flexible, rigid, hinged, or splash-block option based on the route, clearance, and how you need to access the area.
- Measure the downspout and extension before cutting, then align the connection and fasten it securely to help prevent leaks or separation.
- Directing runoff away from the foundation can help limit water pooling and soil washout; consider a roof inspection if drainage problems persist.
Extension distance and discharge placement
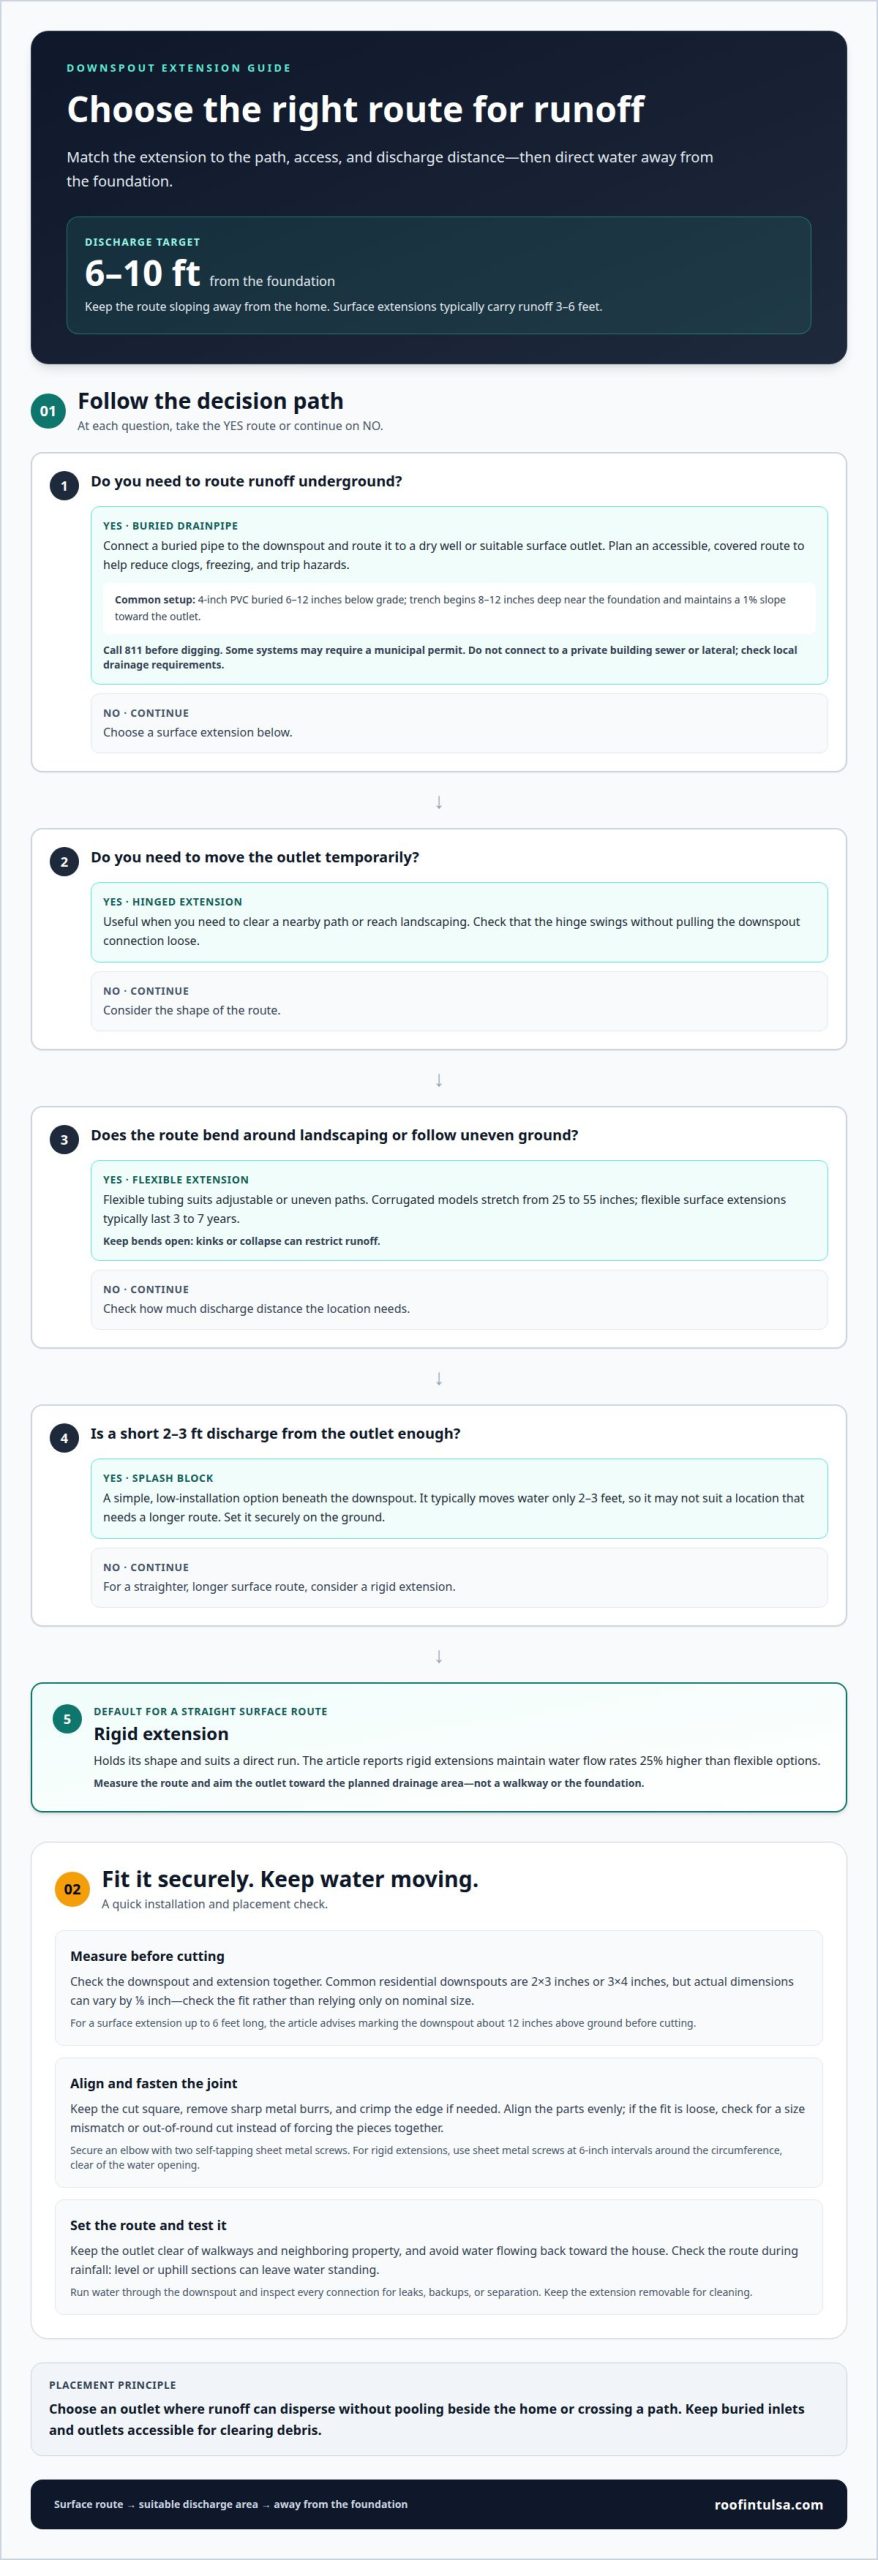
Install an underground extension by connecting a buried drainpipe to the downspout and routing it to a suitable outlet. Direct runoff away from the foundation, and plan an accessible, covered route to help prevent clogs, freezing, and trip hazards.
-
Set the Extension Distance
Measure the route from the downspout to a discharge area that can accept runoff. Aim to release water 6 to 10 feet from the foundation; surface extensions typically carry it 3 to 6 feet. Keep the outlet clear of walkways, neighboring property, and places where water can flow back toward the house. The U.S. Environmental Protection Agency says land beside a home should slope away from it.
Check the entire route during rainfall. A level or uphill section can leave water standing, while a loose connection may leak beside the foundation. Avoid fastening the extension so tightly that it cannot be removed for cleaning.
-
Choose a Discharge Point or Dry Well
Choose an outlet where water can disperse without pooling beside the home or crossing a path. A dry well can collect runoff at the end of an underground route; place it where the surrounding ground can absorb the water and where maintenance access is practical. Use an accessible inlet screen or cleanout to keep leaves and sediment out.
Do not direct the pipe into a private building sewer or lateral. According to the U.S. District Court for the Southern District of Ohio, those connections are unauthorized under MSD rules. Check local drainage requirements before choosing a discharge location.
-
Plan an Underground Extension Drain
Call 811 before digging, then plan a route that slopes continuously toward its outlet. A common setup uses 4-inch PVC buried 6 to 12 inches below grade, with a trench beginning 8 to 12 inches deep near the foundation. Maintain a 1% trench slope so water moves downhill instead of collecting inside the pipe.
Connect the downspout to the buried line, then route the outlet to a dry well or suitable surface discharge point. Some underground systems may require a municipal permit. Use a covered route to reduce surface trip hazards, and keep the inlet and outlet accessible for clearing debris. A steady downhill path also helps prevent standing water that could freeze.
Choosing flexible, rigid, hinged, and splash-block extensions
- Choose a flexible extension when the route needs to bend around landscaping or change position. Corrugated models stretch from 25 to 55 inches, making them useful for short, adjustable runs. Flexible surface extensions typically last 3 to 7 years. Check that the material won’t kink or collapse where it turns, since a restricted opening can slow runoff.
- Select a rigid extension for a straighter route that needs to hold its shape. Rigid extensions maintain water flow rates 25% higher than flexible options, making them a practical choice where steady discharge matters. Measure the path before selecting a length, and make sure the outlet points toward the planned drainage area rather than a walkway or the foundation.
- Use a hinged extension when you need to move the outlet temporarily, such as to clear a nearby path or reach landscaping. Check that the hinge can swing without pulling the downspout connection loose. A splash block is a simpler option beneath a downspout, but it typically moves water only 2 to 3 feet from the outlet, so it may not suit a location needing a longer route.
- Match the extension to the space and its maintenance needs. Flexible tubing suits uneven paths; rigid sections suit direct runs; a hinged type helps when access changes. A splash block needs little installation but still must rest securely on the ground. If runoff keeps overflowing, review the broader gutter system layout before choosing a longer extension.
Cutting, crimping, attaching, and fastening an extension
Learning how to install gutter downspout extensions starts with accurate measurements and a clean fit. Cut carefully, align each connection, and secure it without obstructing water flow.
-
Cut and Crimp the Extension
Measure the downspout and extension together, then mark the cut to match the planned connection. Most residential downspouts are 2×3 inches or 3×4 inches, but manufacturing tolerances can create 1/8-inch variations. Check the actual fit rather than relying on the nominal size alone.
For a surface extension up to 6 feet long, mark the downspout about 12 inches above the ground before cutting. Use a suitable cutting tool, keep the cut square, and crimp the cut edge if needed to help the next section slide on. Remove sharp metal burrs before fitting parts together.
-
Attach the Extension
Slide the extension or elbow onto the downspout, aligning the edges so the joint sits evenly. If the connection feels loose, check for a size mismatch or an out-of-round cut instead of forcing the pieces together. Secure an elbow fitting with two self-tapping sheet metal screws.
For a flexible extension, stretch it to approximately 80% of its maximum length during installation. Keep its corrugations open through bends, since a sharp kink can restrict water flow. Set the outlet direction before fastening, so the extension doesn’t twist under strain. This careful fitting is a key part of how to install gutter downspout extensions securely.
-
Fasten the Extension
Fasten a rigid extension with sheet metal screws at 6-inch intervals around its circumference. Installation supplies can include 1/2-inch stainless steel self-tapping sheet metal screws. Place fasteners through the overlapping section, keeping them clear of the opening where water flows.
After fastening, gently check the joint for movement and make sure the outlet is aligned. Run water through the downspout and watch each connection for leaks, backups, or separation. If water escapes at a seam, reposition the parts and secure the joint before relying on the extension in rainfall.
Benefits of downspout extensions
Some underground drainage systems require approval from the homeowner’s municipality. Extension and installation costs depend on the route, material, excavation, and outlet; request a quote for pricing.
- Move concentrated runoff away from foundation walls to reduce water pressure against them. Hydrostatic pressure near foundation walls can increase by up to 60 pounds per square foot. An extension won’t repair existing foundation damage, but directing roof runoff elsewhere can help reduce one source of water collecting beside the house.
- Protect nearby soil by spreading out the water that leaves a downspout. Concentrated runoff can wash away 2 to 4 inches of topsoil annually, exposing roots and carrying soil toward paths or planting beds. Direct the outlet toward a stable drainage area, then watch during rainfall for pooling or new erosion.
- Reduce the risk of basement water problems by addressing poor drainage near the home. Inadequate drainage is the primary cause of basement water damage, and 98% of basements will experience water damage. Those figures don’t mean an extension prevents every leak; they show why roof runoff deserves attention alongside other sources of moisture.
- Check local drainage requirements before building an underground route, especially if it changes where water leaves your property. Keep the outlet clear and inspect it after heavy rain so debris or soil doesn’t redirect flow toward the foundation. If gutter layout or discharge problems need a broader fix, consider professional gutter installation suited to the home.
Rescue Roofing Tulsa: Residential Roof Replacement
Rescue Roofing Tulsa can help when drainage issues point to a broader roof or gutter concern. If water continues to collect near your home after you redirect the downspout, a roof inspection can assess the roof and its drainage setup. For worn or damaged roofing, residential roof replacement may be appropriate; gutter installation can address gutter-system needs.
Downspout extensions direct runoff, but they do not fix damaged shingles, roof leaks, or failing gutters. Watch for recurring leaks, visible roof damage, or gutters that overflow despite a clear outlet. These signs can help you decide whether to start with an inspection or repair.
Contact Rescue Roofing Tulsa to discuss a roof or gutter concern and choose a practical next step.
Keep Water Management on Your Home’s Maintenance List
Understanding how to install gutter downspout extensions is a practical first step, but drainage needs attention beyond installation day. After rainfall, check where water flows and look for new pooling, erosion, or damp areas. These changes can help you recognize when the roof or drainage system needs a closer look.
Rescue Roofing Tulsa provides residential and commercial roof replacement, as well as roof repair. These services may be relevant when runoff problems occur alongside visible roof damage or recurring leaks. Addressing the roof concern can be part of a broader plan to protect your property, rather than relying on an extension alone.
For help assessing a roof concern, contact Rescue Roofing Tulsa. A thoughtful next step can help you keep your home’s water management on track.
Frequently Asked Questions
Can You Attach Downspout Extension Kits Without Tools?
Some kits connect by hand, while rigid extensions often need screws and a driver. Check how the kit attaches to the downspout before starting, then gently move the connected parts to test the fit. A hand-fit connection can work for a temporary setup, but it still needs to stay aligned as water flows. If the pieces wobble or separate, secure the joint with compatible fasteners.
What Slope Is Required for Proper Rainwater Drainage?
For a surface extension, plan a downhill slope of at least 2%. An underground trench should maintain a 1% slope toward its outlet, while a splash block should slope 1/4 inch per foot away from the foundation. These approaches differ because the water travels across different surfaces. Check the entire route, not just the outlet, for low spots where runoff could collect.
What Tools and Materials Are Needed to Install Gutter Downspout Extensions?
Gather a tape measure, marker, a cutting tool suited to the extension material, compatible extension pieces, and sheet metal screws for rigid joints. Use a screwdriver or drill to drive self-tapping screws. For a buried route, you will also need drainpipe and digging tools. Measure the existing downspout before buying parts, since common rectangular sizes may still differ slightly in fit.
How Do You Install a Flexible or Corrugated Downspout Extension Step by Step?
First, check that the flexible section fits the downspout outlet. Stretch it to about 80% of its maximum length, then guide it along the planned route without sharp bends. Attach its connector and point the outlet toward the drainage area. Run water through the gutter and watch for kinks, loose joints, or pooling. Adjust the route if any section bends sharply or holds water.
How Do You Attach a Rigid Downspout Extension to an Existing Downspout?
Fit the rigid extension over the downspout or elbow, matching their edges and keeping the water passage clear. Secure the overlapping joint with sheet metal screws, spaced 6 inches apart around the circumference. For an elbow fitting, use two self-tapping screws. Before testing, check that each screw holds the joint firmly without protruding into the channel or obstructing runoff.
How Far Should a Downspout Extension Carry Water From a House Foundation?
Aim to discharge runoff 6 to 10 feet from the foundation. The right endpoint also depends on the ground’s slope and where water can drain without returning toward the house. For example, a short extension that empties beside a walkway may leave water too close. Observe the outlet during rainfall and adjust its direction if water pools or flows back toward the foundation.