




Table of Contents
- What Is a Commercial Roof Inspection Checklist?
- The Commercial Roof Inspection Report Template: What to Record
- Common Commercial Roofing Problems to Look For
- How Often to Inspect a Commercial Flat Roof
- Building Your Commercial Roof Maintenance Schedule
- Post-Storm Inspection Protocols and Safety
- Your Roof Inspection Checklist: Key Takeaways
- Frequently Asked Questions
Last Updated: September 8, 2026
What Is a Commercial Roof Inspection Checklist?
A commercial roof inspection checklist is a systematic document used to evaluate the condition of a low-slope or flat roofing system, identifying defects before they become costly failures. It organizes the assessment of roof surfaces, drainage, flashing, penetrations, and structural components into a repeatable process any qualified inspector can follow.
Most building owners discover roof problems only after water stains appear on the ceiling, when the membrane has already failed. A thorough inspection checklist catches those issues months or years earlier, when the repair is measured in dollars rather than tens of thousands.
The checklist also serves a second purpose: documentation. Insurance carriers, warranty administrators, and commercial lenders increasingly expect proof of regular preventative maintenance. Without inspection records, a warranty claim can be denied outright, and an insurance claim after storm damage becomes an uphill battle.
The Commercial Roof Inspection Report Template: What to Record
The commercial roof inspection report template is the deliverable that turns a visual walk into an actionable asset. A well-structured template forces the inspector to check every critical zone, creates a historical record for warranty and insurance purposes, and communicates findings to stakeholders who were not on the roof.
Core Data Fields Every Template Must Include
Your report template should capture these data points for every inspection:
- Inspection metadata: date, start/end time, weather conditions (temperature, precipitation, wind speed), inspector name and certification number
- Roof system identification: membrane type (TPO, PVC, EPDM, modified bitumen, BUR, metal), age, manufacturer, warranty type and expiration date
- Roof surface condition: blistering, cracking, seam separation, alligatoring, fishmouths, or deterioration in the membrane field
- Drainage performance: ponding water locations (with GPS coordinates), blocked scuppers, gutters, and interior drains
- Flashing and penetration seals: condition at parapet walls, HVAC curbs, pipe penetrations, and any other roof-top penetrations
- Fastener and metal component checks: corrosion, loose screws, popped rivets, or back-out in standing seam and metal systems
- Structural integrity: buckling, ridging, deflection, or soft spots in the roof deck
- Safety observations: condition of fall protection anchors, guardrails, and access points
Each finding should include a photograph with a timestamp and a severity rating on a consistent 1-3 scale (1 = minor, monitor; 2 = repair within 90 days; 3 = immediate action required).
Digital Documentation: Moving Beyond Paper
The most significant upgrade most building owners can make is moving from paper checklists to digital documentation. Tablet-based inspection software such as RoofSnap, AccuLynx, or Trax offers three advantages over paper:
- Geotagged photos: Each image is automatically stamped with GPS coordinates, proving the photo was taken at the reported location.
- Historical comparison: Digital templates store prior inspection data, allowing side-by-side comparison of the same detail across visits. Slow deterioration invisible in a single photo becomes obvious when images are stacked chronologically.
- Instant report generation: Software platforms produce a professional PDF report at the push of a button, complete with your logo, findings summary, and photo documentation, shareable with property managers, adjusters, and warranty administrators.
If you are not ready for dedicated software, a structured spreadsheet template with consistent columns and a naming convention for photos is a meaningful improvement over a memory-based assessment. The key is consistency, the same fields, the same photo angles, the same severity scale, every visit.
The Photo Documentation Standard
Insurance adjusters and warranty administrators evaluate claims based on documentation quality. A report with 20 photos of the same ponding area is less useful than one with 10 photos covering 10 distinct defects. Adopt a standard photo protocol:
- Wide shot of each roof quadrant (4 photos minimum)
- Close-up of every penetration, flashing detail, and drain (2-3 photos each)
- Scale reference in every defect close-up
- Overall building shot from ground level for context
Create a digital folder structure by date and roof zone (e.g., `2026-09-08/Quadrant_A`). When you need to file an insurance claim three years from now, you will be able to produce a complete history in minutes rather than hours.
Regulatory and Insurance Compliance Considerations
Your inspection report serves a legal function beyond maintenance planning. Most commercial property insurance policies include a maintenance clause requiring the insured to maintain the property in good condition. A documented history of regular inspections demonstrates compliance and strengthens your position if a claim is disputed; a gap in records can be cited as evidence of neglect, potentially reducing a claim payout.
For buildings with roof warranties, the manufacturer’s warranty terms typically require preventative maintenance inspections at specified intervals, often twice per year. Failure to document these inspections can void the warranty entirely.
OSHA’s walking-working surfaces standard also has implications for inspection documentation. If your roof has permanent fall protection anchors, those anchors must be inspected and documented regularly. Your roof inspection report should include a section for anchor condition, with photos, to demonstrate compliance with OSHA 1910.28 requirements.
Building a Template That Works for Your Team
A template that is too complex will be ignored; one that is too simple will miss critical data. The right balance for most organizations is a two-page document: page one captures the systematic survey with checkboxes and severity ratings; page two captures the defect log with photo references and recommended actions. Review the template annually and update it as you learn what data drives repair decisions.
The inspection report is not a formality, it is the primary evidence in any warranty claim, insurance dispute, or budget request. Invest the same care in documenting the roof as you would in documenting a financial transaction. A roof without a report history is a roof without a defense.
Common Commercial Roofing Problems to Look For
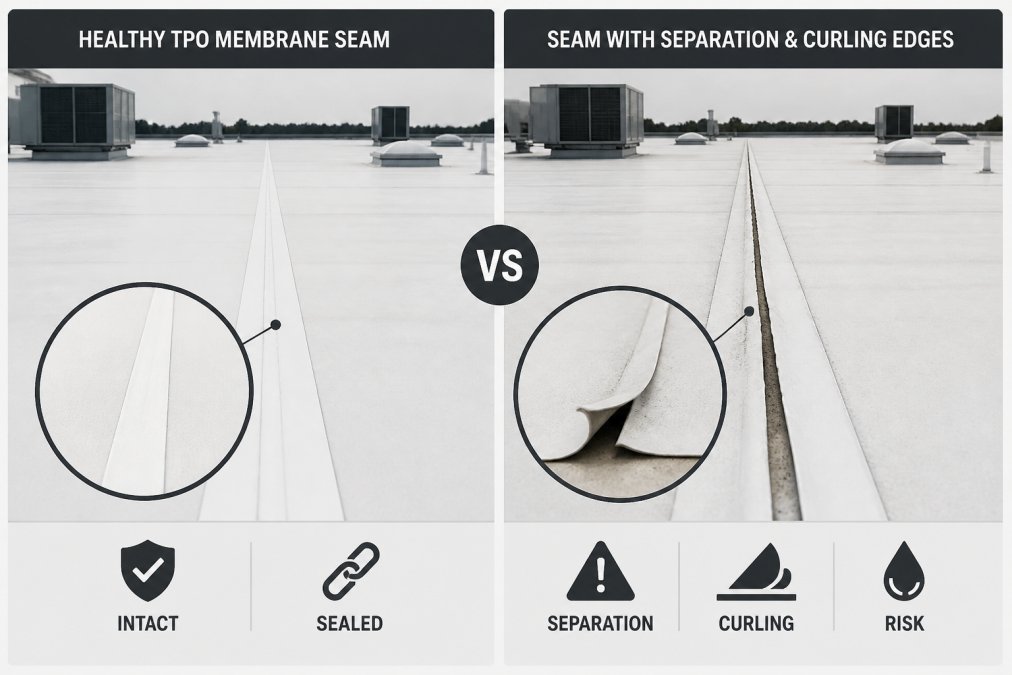
Most roof defects follow recognizable visual patterns. Training your eye to spot these patterns separates a useful inspection from a wasted walk. Below is a field guide to the defects you will most likely encounter, organized by the visual signature each one leaves.
Membrane Surface Defects
Blistering appears as raised, dome-shaped bubbles ranging from a quarter-inch to several feet across. On built-up roofs (BUR), blisters feel spongy underfoot and indicate trapped moisture between plies. On single-ply membranes like TPO or PVC, blisters often signal solvent trapping during installation or moisture migrating from the deck below. When you find one blister, probe the surrounding area, they rarely travel alone.
Alligatoring describes a pattern of deep, interconnected cracks that resemble reptile skin on asphalt-based membranes. This condition indicates the bitumen has lost its volatile oils and become brittle. Once alligatoring reaches the reinforcement mat, the membrane has lost its waterproofing integrity and requires replacement rather than coating.
Fishmouths are V-shaped openings at membrane laps where the seam has not fully adhered. They occur most often at corners or where the membrane was pulled too tight during installation. Any fishmouth wider than a pencil lead is an active leak path.
Drainage and Water-Related Signs
Ponding water is defined by most membrane manufacturers as water that remains 48 hours after a rain event. Look for the depth of the pond, discoloration at the waterline, and vegetation or algae growth. Dark staining indicates the membrane is absorbing water; green algae signals organic matter has been sitting long enough to support growth, a warranty violation on most systems.
Efflorescence on masonry parapets or around roof penetrations appears as a white, chalky powder. It signals that water is migrating through the substrate, carrying dissolved salts to the surface. Efflorescence below a flashing detail is a reliable indicator of a flashing failure above.
Flashing and Penetration Defects
Flashing delamination shows as peeling or curling at the base flashing where it meets the membrane or the wall. On metal flashings, look for rust bleeding, orange or brown streaks running down the membrane from the flashing edge. This indicates the galvanized coating has failed and the underlying steel is corroding.
Open laps at penetrations are visible as lifted edges around pipe boots, HVAC curbs, or conduit posts. The sealant bead may be cracked, shrunken, or completely missing. A common pattern is sealant that has pulled away from the substrate, leaving a crescent-shaped gap that channels water directly into the penetration. commercial building inspection.
Fastener and Metal Component Defects
Pop-rivet failure on standing seam metal roofs shows as raised or missing rivet heads along the seam. Screw back-out appears as screws standing proud of the deck, often with a rust ring around the base. On exposed fastener systems, a screw that has backed out even 1/8 inch has compromised the gasket seal.
Galvalume or galvanized corrosion starts as a white, powdery deposit (zinc oxide) before progressing to red rust. White rust is an early warning, the protective coating is sacrificing itself. Red rust means the substrate is actively deteriorating.
Structural and Substrate Signs
Ridging or wrinkling in the membrane, particularly in a linear pattern across the field, often indicates insulation board movement or deck deflection beneath. Splits at corners or along stress lines suggest the membrane lacks sufficient reinforcement or the substrate is moving independently.
Photograph every defect with a common object for scale, a coin, a pencil, or your boot. A blister photographed from six feet away looks identical to a shadow. Scale reference makes your documentation useful to an adjuster or contractor who cannot visit the site.
The Debris Connection
Debris does not just clog drains, it actively creates defects. Leaves decompose into organic acids that accelerate membrane degradation. Windblown gravel acts as sandpaper under foot traffic. Metal shavings from rooftop HVAC work embed in TPO and PVC membranes, creating puncture points. During your inspection, note not just the presence of debris but its type; a roof with scattered metal debris needs a magnet sweep before the next membrane repair.
Walk the roof in a systematic grid pattern, pausing at every penetration, curb, and flashing detail. Look at each component from directly above and from a low angle that catches shadows, which reveal surface irregularities that flat lighting hides. Carry a moisture meter if available; it turns a visual suspicion into a measured data point.
How Often to Inspect a Commercial Flat Roof
Commercial flat roofs should receive a professional inspection at least twice per year, once in the spring and once in the fall, plus a dedicated assessment after any major storm event. This biannual rhythm aligns with the seasonal stress cycles that most damage roofing systems.
Spring inspections focus on the damage left by winter freeze-thaw cycles and ice damming. Fall inspections prepare the roof for the heavy rain and wind months ahead, clearing drainage paths and addressing wear from summer heat. The National Roofing Contractors Association guidelines recommend this twice-yearly schedule as the baseline for preventative maintenance on low-slope systems.
Several factors push the frequency higher:
- Roof age: systems past their 15-year mark need more frequent attention
- Tree exposure: overhanging branches drop debris and abrade the membrane
- HVAC activity: roofs with heavy mechanical equipment see more foot traffic and vibration damage
- Prior storm history: roofs with previous hail or wind claims warrant closer monitoring
A roof that has already leaked once should be inspected quarterly until the root cause is confirmed and corrected. The cost of an extra inspection is trivial compared to drywall replacement, mold remediation, and disrupted operations.
Building Your Commercial Roof Maintenance Schedule
A commercial roof maintenance schedule translates your inspection findings into a calendar of proactive actions that extend the roof’s service life and preserve its warranty coverage. Pair each identified problem with a specific response and a deadline for completion.
Build the schedule around three tiers of activity:
| Maintenance Tier | Frequency | Typical Actions |
|---|---|---|
| Routine | Twice yearly | Debris removal, drain cleaning, visual survey |
| Preventive | Annually | Sealant touch-up, fastener tightening, flashing repair |
| Major | Every 3-5 years | Membrane coating, selective replacement, re-flashing |
Routine visits keep the roof clean and document its condition. Preventive work addresses small defects found during inspections before water finds them. Major maintenance cycles renew aging components and can add years of service life to a sound roof deck.
The single most cost-effective maintenance action is keeping drains and scuppers clear. Clogged drainage turns every rain event into a structural load test and forces water to find the weakest point in the membrane.
Document every maintenance action with the same rigor as the inspections themselves. A complete maintenance log strengthens your position in any warranty dispute and demonstrates due diligence to insurance carriers.
Post-Storm Inspection Protocols and Safety
After any severe weather event, a dedicated storm inspection should occur within days, not weeks, to document damage for insurance purposes and prevent further water intrusion. Hail, high winds, and flying debris each leave distinct signatures that a trained inspector can identify.
The post-storm protocol follows a specific sequence:
- Document the event: record the storm date, type, and estimated severity
- Conduct a ground-level assessment first, looking for displaced flashing, gutter damage, and fallen branches
- Perform a roof-level survey for hail impact marks, membrane punctures, and lifted seams
- Photograph every finding before any temporary repair is made
- File documentation promptly with your insurance carrier
Insurance policies typically require prompt notice of a claim, and delaying a roof inspection after a storm gives minor damage time to become major interior damage. A fast, documented response also simplifies the claims process.
Safety is non-negotiable during post-storm assessments. Wind can shift roof-mounted equipment, hail can create unseen slip hazards, and saturated insulation can compromise the deck’s load capacity. OSHA’s fall protection standards for construction require guardrails, safety nets, or personal fall arrest systems on any low-slope roof edge where workers are exposed to falls of six feet or more. If you lack the training and equipment, hire a professional who carries the proper safety gear and liability coverage.
Never attempt a roof inspection during active weather or immediately after a lightning strike. Wet membranes are extremely slippery, and the structural integrity of a storm-damaged roof cannot be verified from the ground.
Your Roof Inspection Checklist: Key Takeaways
A commercial roof inspection checklist is only as valuable as the consistency with which you use it. The roof system that receives a documented, professional inspection twice a year, plus after every major storm, will outlast the neglected roof by years and cost a fraction to maintain.
The core components to remember are the roof surface and membrane, drainage and water flow, flashing and penetration seals, fasteners and metal components, and overall structural integrity. Each area gets photographed, rated, and logged in a report template that builds a history over time, your best defense in warranty claims, insurance disputes, and budget planning.
For building owners who lack the time or expertise to conduct thorough inspections, professional inspection services with detailed reporting provide the documentation and peace of mind that protect your asset. Many property managers find that a professional eye catches the subtle signs of moisture intrusion that an untrained walk misses entirely.
The difference between a roof that fails at year 12 and one that serves 25 years is rarely the quality of the original installation, it is the quality of the maintenance that follows. A disciplined inspection routine, backed by clear documentation and prompt repairs, is the most reliable way to protect your building, your tenants, and your bottom line. At Rescue Roofing, our accurate aerial quotes give commercial property owners a complete picture of their roof’s condition before any work begins. We also assist with insurance claim filing and communicate directly with adjusters. Call us today to schedule your next commercial roof inspection and get a clear answer on the true state of your roof.
Frequently Asked Questions
What should be included in a commercial roof inspection?
A thorough commercial roof inspection checklist covers the roof membrane for blistering, cracking, or seam separation; flashing and penetrations like HVAC curbs; drainage systems including scuppers and gutters; and signs of moisture intrusion. It also includes checking fasteners, metal components, and structural integrity for buckling. Documenting findings with photos and notes on a report template is essential for tracking deterioration and supporting insurance claims.
How often should a commercial roof be inspected?
Most manufacturers require inspections twice a year, typically in spring and fall, to keep the roof warranty valid. You should also schedule a professional inspection after any major storm or hail event. If your commercial flat roof is older or has a history of leaks, consider quarterly inspections as part of your commercial roof maintenance schedule.
Can a property owner perform their own commercial roof inspection?
You can perform a visual inspection from ground level or a safe access point, looking for obvious issues like debris accumulation or visible damage. However, a professional inspection is recommended for a full assessment. Professionals have the safety harness and fall protection training to walk the roof surface safely and use non-destructive testing like thermal imaging to find hidden moisture intrusion.
Why is a documented roof inspection report important for insurance claims?
A documented report with dated photos provides proof of the roof’s condition before a storm, which is critical when filing a claim. Insurance adjusters rely on this evidence to distinguish storm damage from pre-existing deterioration. A professional inspection report template helps you maintain a clear history of preventative maintenance, which can protect you from claim denials and speed up the process.
What is the difference between a roof inspection and a roof survey?
A roof inspection is a physical assessment of the roof’s current condition, identifying defects, leaks, or damage. A roof survey, often called a drone or aerial survey, uses technology to map the roof’s dimensions, slopes, and features. Rescue Roofing uses accurate aerial quotes and surveys to provide precise measurements, which complements a physical inspection for repair scopes and insurance documentation.