



Table of Contents
- What You’ll Need Before Inspecting Your Roof for Storm Damage
- Step 1, Identify the Most Common Signs of Storm Damage on Your Roof
- Step 2, Spot Hail Damage Roof Indicators You Shouldn’t Ignore
- Step 3, Recognize Wind Damage Roofing Signs and Uplift Patterns
- Step 4, Check Gutters, Downspouts, and Interior Spaces for Water Intrusion
- Storm Damage vs. Normal Wear and Tear: How to Tell the Difference
- How to Do a Safe Roof Inspection After a Storm in Oklahoma
- Filing a Roof Insurance Claim: A Documentation Guide for Homeowners
Last Updated: July 30, 2026
Knowing the signs of storm damage on roof surfaces is the difference between a $500 repair and a $15,000 replacement. This guide shows you exactly how to inspect your roof safely, document damage for your insurer, and handle the regional storm patterns that make Oklahoma roofs uniquely vulnerable.
What You’ll Need Before Inspecting Your Roof for Storm Damage
Before you step outside after a storm, gather these items:
- Binoculars (8×42 or better) for ground-level viewing
- A smartphone with a camera and cloud backup for documentation
- A notepad or inspection app to log findings with timestamps
- Stable, non-slip footwear if you plan to access a ladder
- A helper to stabilize any ladder you use
Structural integrity is your first concern. A roof compromised by wind uplift or hail impact can be unstable underfoot. According to OSHA’s residential fall prevention guidelines, falls from roofs and ladders account for a significant share of residential construction fatalities annually.
Safety Protocols for DIY Ground-Level Inspection
A ground-level inspection is the only approach most homeowners should attempt without professional training. Walk the perimeter of your home slowly, using binoculars to scan each roof plane. Look at the ridge line, the field of the roof, and the edges near the fascia and soffit. Note anything that looks out of place: discoloration, missing shingles, lifted edges, or debris accumulation.
Do NOT attempt to walk a roof that is wet, steep, or visibly buckled. If you see sagging sections, exposed underlayment, or structural deformation, stop your inspection and call a licensed roofing contractor immediately.
Photograph everything from multiple angles before touching anything. Timestamps on photos are critical for insurance claims.
Never inspect a roof alone. If you lose your footing on a ladder or slope, you need someone present to call for help. This is not optional, it’s the single most important safety rule for post-storm inspections.
Step 1, Identify the Most Common Signs of Storm Damage on Your Roof
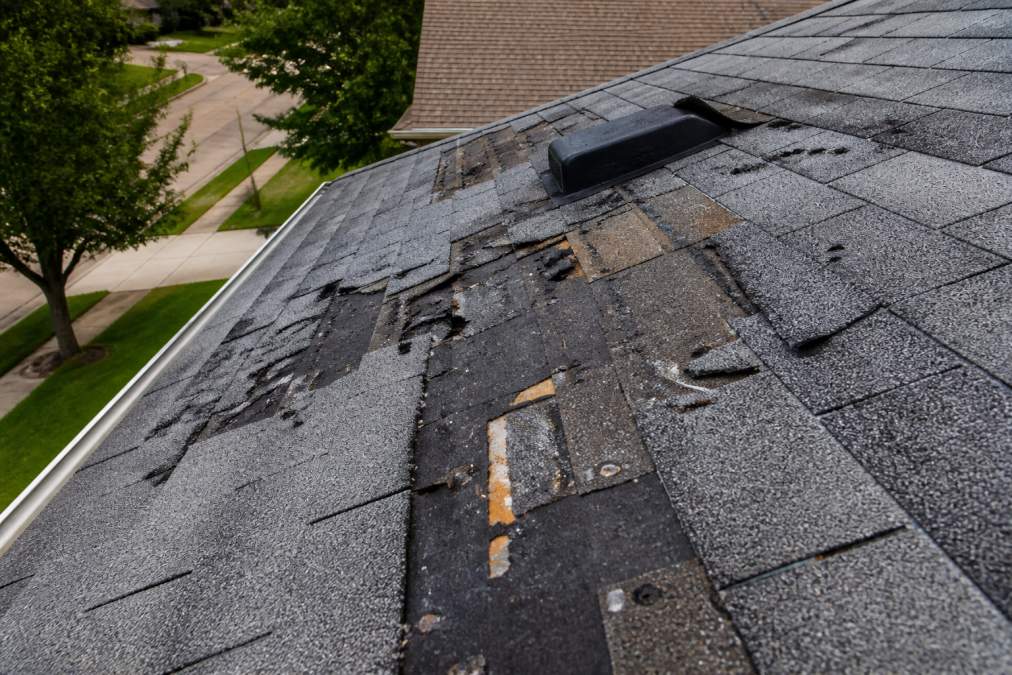
The most common signs of storm damage fall into three primary categories: shingle damage, flashing failure, and soffit or fascia deterioration. Catching any one of these early prevents water intrusion from progressing into the roof deck, insulation, and interior structure.
Missing, Cracked, or Curled Shingles
Missing shingles are the most visible indicator, but cracked and curled shingles are often more telling. Wind uplift breaks the seal strips that hold asphalt shingles flat, causing edges to curl upward. Once curled, those shingles funnel water beneath the surface rather than shedding it.
Cracked shingles typically result from impact or thermal stress combined with storm exposure. On fiberglass matting-based asphalt shingles, cracks can run through the granule layer and into the mat itself, destroying the shingle’s waterproofing function.
Granule Loss on Asphalt Shingles
Granule loss is the most underestimated sign of storm damage. Asphalt shingles rely on their granule coating to reflect UV radiation and protect the underlying mat from heat degradation. When hail or high-velocity wind strips those granules, the exposed asphalt oxidizes rapidly.
Check your gutters and downspouts after any storm. A significant accumulation of dark, sand-like granules is a direct indicator of shingle surface damage. An established roof shedding granules heavily after a storm is a red flag.
Damaged Flashing, Soffit, and Fascia
Flashing is the metal sheeting installed at roof penetrations, valleys, and transitions. Wind gets underneath it and peels it away from the seals, allowing water to enter at the most vulnerable points: around chimneys, skylights, roof vents, and wall junctions.
Soffit and fascia damage often accompanies wind events. Soffits are the horizontal boards under your roof’s overhang; fascia runs along the roofline’s edge. When these are damaged, water can enter the attic from the sides rather than through the field of the roof.
| Damage Type | Where to Look | Urgency Level | Common Cause |
|---|---|---|---|
| Missing shingles | Roof field, ridgeline | High | Wind uplift |
| Granule loss | Gutters, downspouts | Medium-High | Hail, age + storm |
| Curled shingles | Roof edges, valleys | Medium | Seal strip failure |
| Flashing damage | Chimney, vents, valleys | High | Wind, thermal expansion |
| Soffit/fascia damage | Roof perimeter | Medium | Wind-driven debris |
| Cracked shingles | Field of roof | High | Impact, thermal stress |
Step 2, Spot Hail Damage Roof Indicators You Shouldn’t Ignore
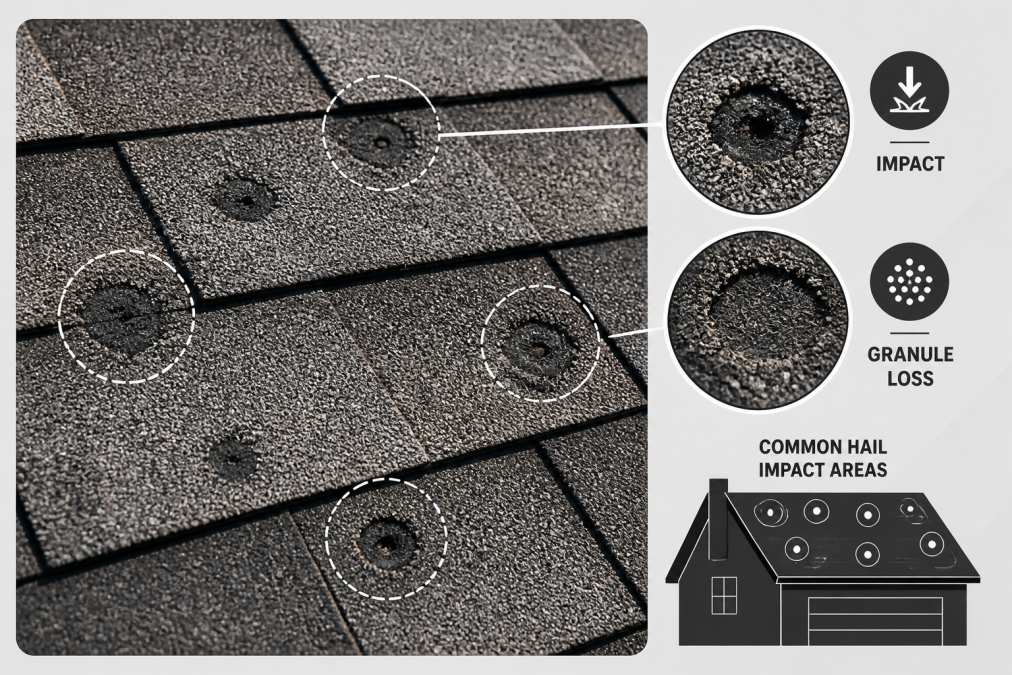
Hail damage roof indicators are distinct from wind damage. The key marker is circular impact marks: dark, bruised-looking spots on asphalt shingles where the granule layer has been knocked away and the underlying mat is exposed or dented. These marks are typically random in distribution across the roof field.
Hail impact also dents metal components: roof vents, flashing, gutters, and downspouts. Dented gutters are one of the most reliable indicators of a hail event significant enough to damage roofing materials.
Hail damage doesn’t always cause immediate leaks. The fiberglass matting beneath the granules may remain intact after impact, but the mat is weakened. Within one to three seasons, those impact points become the first places where leaks develop. According to the Insurance Information Institute’s guidance on property claims, documenting damage immediately after a storm event strengthens your claim and reduces disputes with adjusters.
After a hail event, check your window screens and air conditioning unit fins. If those surfaces show impact damage, you have physical evidence to support [a roof](/blog/how-to-file-a-roof-damage-insurance-claim-in-tulsa-a-step-by-step-guide/) damage claim even before a professional gets on the roof.
Roof age plays a significant role in hail damage severity. Older asphalt shingles with already-depleted granule layers are far more vulnerable to impact damage than newer roofing materials.
Step 3, Recognize Wind Damage Roofing Signs and Uplift Patterns
Wind damage roofing patterns follow predictable physics. High-velocity wind creates positive pressure on the windward side of a roof and negative pressure on the leeward side, generating uplift forces that pull shingles away from the deck. The areas most vulnerable are the ridgeline, the corners, and the perimeter edges.
Look for shingle damage at the edges first, then work toward the field. Lifted shingles at the perimeter often indicate that seal strips have failed across a wider area.
Wind also drives debris. Branches, gravel, and other materials impact the roof surface at high velocity, cracking shingles and damaging flashing. Check for debris accumulation in valleys and around roof vents after any significant storm.
Step 4, Check Gutters, Downspouts, and Interior Spaces for Water Intrusion
Gutters and downspouts are your first diagnostic tool after a storm. Granules in the gutters indicate shingle surface loss. Dents on the gutter face indicate hail. Separated seams or pulled-away sections indicate wind load or debris impact.
Check your attic within 24 hours of a major storm. Look for water stains on the underside of the roof deck, wet or compressed insulation, daylight visible through the roof deck, or mold or mildew odor.
Check interior ceilings on the top floor for water stains, bubbling paint, or soft spots. These indicate that water has moved through the roof deck and into the living space.
Interior water stains are a lagging indicator. By the time you see a stain on your ceiling, the roof has been leaking long enough for moisture to saturate insulation and reach drywall. Act on exterior damage signs before interior damage appears.
Storm Damage vs. Normal Wear and Tear: How to Tell the Difference
Storm damage is sudden, event-driven, and typically concentrated in patterns consistent with wind direction or hail trajectory. Normal wear and tear is gradual, distributed evenly across the roof, and correlates with roof age and sun exposure.
Specific indicators of storm damage rather than wear and tear:
- Damage concentrated on one side of the roof (consistent with wind direction)
- Impact marks in a random but dense pattern across the field (hail)
- Shingles missing in groups rather than individually
- Flashing that has been pulled away rather than corroded in place
- Damage that appeared suddenly after a documented weather event
Indicators of normal wear and tear that insurers will use to deny claims:
- Uniform granule loss across all roof planes
- Curled shingles distributed evenly without concentration
- Cracking consistent with thermal cycling over many years
A skilled roofing contractor can document which damage is storm-related and which is pre-existing, which is critical for a successful insurance claim.
How to Do a Safe Roof Inspection After a Storm in Oklahoma
Oklahoma’s storm season creates specific inspection challenges. Tulsa and surrounding areas face a combination of severe hail, straight-line winds, and tornado-adjacent weather systems that can produce multiple damage types in a single event.
Regional Storm-Specific Damage in Tulsa and Surrounding Areas
Tulsa sits in a region where large hail events are common during spring and early summer. The combination of hail impact and high-velocity winds that accompany severe thunderstorms means local roofs often sustain both impact damage and wind uplift simultaneously.
Straight-line winds from derecho events produce damage patterns that look different from tornado damage but can be equally severe. These winds strip shingles in directional bands rather than rotational patterns, and adjusters sometimes misclassify the cause. Accurate documentation from the outset prevents those misclassifications.
According to NOAA’s Storm Events Database for Oklahoma, northeastern Oklahoma consistently ranks among the most active regions nationally for large hail and severe thunderstorm events, which directly affects roof replacement frequency and insurance claim volumes in the Tulsa metro area.
Temporary Mitigation Techniques While You Wait for Repairs
The period between storm damage and professional repair is when secondary damage occurs. Temporary mitigation is not optional.
Approved temporary measures:
- Roof tarping: Heavy-duty polyethylene tarps secured over damaged areas prevent water entry. Extend the tarp over the ridge and secure it with weighted boards or specialized tarp anchors.
- Roof cement or sealant: For small areas of exposed underlayment or lifted flashing, roofing-grade sealant provides short-term protection.
- Interior water collection: Place buckets or absorbent materials under active leaks. Document the leak location and volume for your insurance claim.
Keep all receipts for emergency materials. Most homeowner’s insurance policies cover reasonable temporary repair costs as part of the claim.
Filing a Roof Insurance Claim: A Documentation Guide for Homeowners
Filing a roof insurance claim successfully requires documentation that begins before the adjuster arrives.
Pre-claim documentation checklist:
- Photograph all damage from ground level with timestamps enabled
- Photograph gutters showing granule accumulation
- Photograph any interior water stains or wet insulation
- Note the date and time of the storm event
- Save any weather service alerts or news reports confirming the event
- Document damage to other property (vehicles, fencing, AC units) that corroborates hail or wind
During the adjuster visit:
- Be present for the inspection
- Walk the roof with the adjuster if safe to do so
- Point out all damage you’ve documented
- Ask for a copy of the adjuster’s report before they leave the site
After the adjuster visit:
- Review the estimate carefully against your contractor’s assessment
- If the estimates diverge significantly, request a re-inspection with your contractor present
- Understand your policy’s depreciation terms: actual cash value vs. replacement cost value affects your payout significantly
The National Association of Insurance Commissioners’ consumer guide to homeowner claims outlines your rights during the claims process, including the right to dispute an adjuster’s assessment through your state’s insurance department.
Rescue Roofing assists Tulsa-area homeowners through the entire claims process: from the initial inspection and documentation to direct communication with insurance adjusters. The team uses accurate aerial measurement technology to produce documentation that aligns with how adjusters evaluate claims, reducing disputes and accelerating settlements. Financing options are also available for costs not covered by insurance.
Storm damage doesn’t wait for a convenient time, and delayed repairs always cost more than prompt ones. If you’ve spotted any of the warning signs covered in this guide, the next step is a professional inspection before the damage progresses. Rescue Roofing offers thorough inspections, accurate aerial quotes, and direct assistance with insurance claim filing and adjuster communication. Call Rescue Roofing to schedule your post-storm inspection and get a clear picture of what your roof actually needs.
Frequently Asked Questions
Can you tell if your roof is damaged from the ground?
Yes, many signs of storm damage on a roof are visible from the ground with binoculars. Look for missing or curled shingles, dented gutters, granule accumulation in downspouts, and sagging areas. However, a ground-level check won't reveal underlayment damage, compromised flashing, or early-stage water intrusion. After any significant storm, a professional roof inspection after the storm is the safest way to get a complete picture of your roof's structural integrity.
What does hail damage on a roof look like?
Hail damage on asphalt shingles typically appears as dark, circular impact marks where the granules have been knocked away, exposing the fiberglass matting beneath. You may also notice random, bruise-like soft spots when you press the shingle. On gutters and downspouts, hail impact leaves round dents. Hail damage roof repair should be addressed quickly because exposed areas accelerate moisture intrusion, blistering, and long-term structural deterioration.
How soon should I get my roof inspected after a storm?
Ideally, schedule a professional roof inspection after a storm within 24 to 72 hours. Most homeowner's insurance policies have time-sensitive requirements for reporting storm damage, and delaying can complicate your claim. In Tulsa and surrounding Oklahoma areas, severe hail and tornado-producing storms are common, so acting quickly matters. A roofing contractor can document damage, apply temporary mitigation if needed, and help you start the insurance claim process before conditions worsen.
Will my homeowner's insurance cover storm damage roof repairs?
Most standard homeowner's insurance policies in the United States cover sudden storm damage, including hail, wind, and falling debris, as a covered peril. However, insurers typically distinguish between storm damage and normal wear and tear or deferred maintenance. Filing a roof insurance claim successfully depends on clear documentation: timestamped photos, a written contractor assessment, and prompt reporting. Working with a roofing contractor experienced in insurance claims can help ensure your adjuster sees the full scope of damage.
What should I do immediately after discovering roof storm damage?
First, stay safe, avoid walking on a potentially compromised roof. Document everything with photos and video from the ground or a safe vantage point. Apply temporary mitigation like a tarp over exposed areas to prevent further water intrusion. Contact your homeowner's insurance company to report the damage and begin filing your roof insurance claim. Then schedule a professional roof inspection after the storm to get a thorough damage assessment before your adjuster arrives.
How do I tell storm damage apart from normal roof wear and tear?
Storm damage tends to be localized, sudden, and pattern-specific, for example, hail creates uniform circular impact marks, while wind uplift causes shingles to peel from edges or ridges. Normal wear and tear shows up as gradual, widespread granule loss, blistering from UV exposure, or curled shingles across the entire roof surface. Roof age also matters: an older roof may show both. A professional inspection can distinguish between the two, which is critical when filing an insurance claim.
This article was written using GrandRanker