


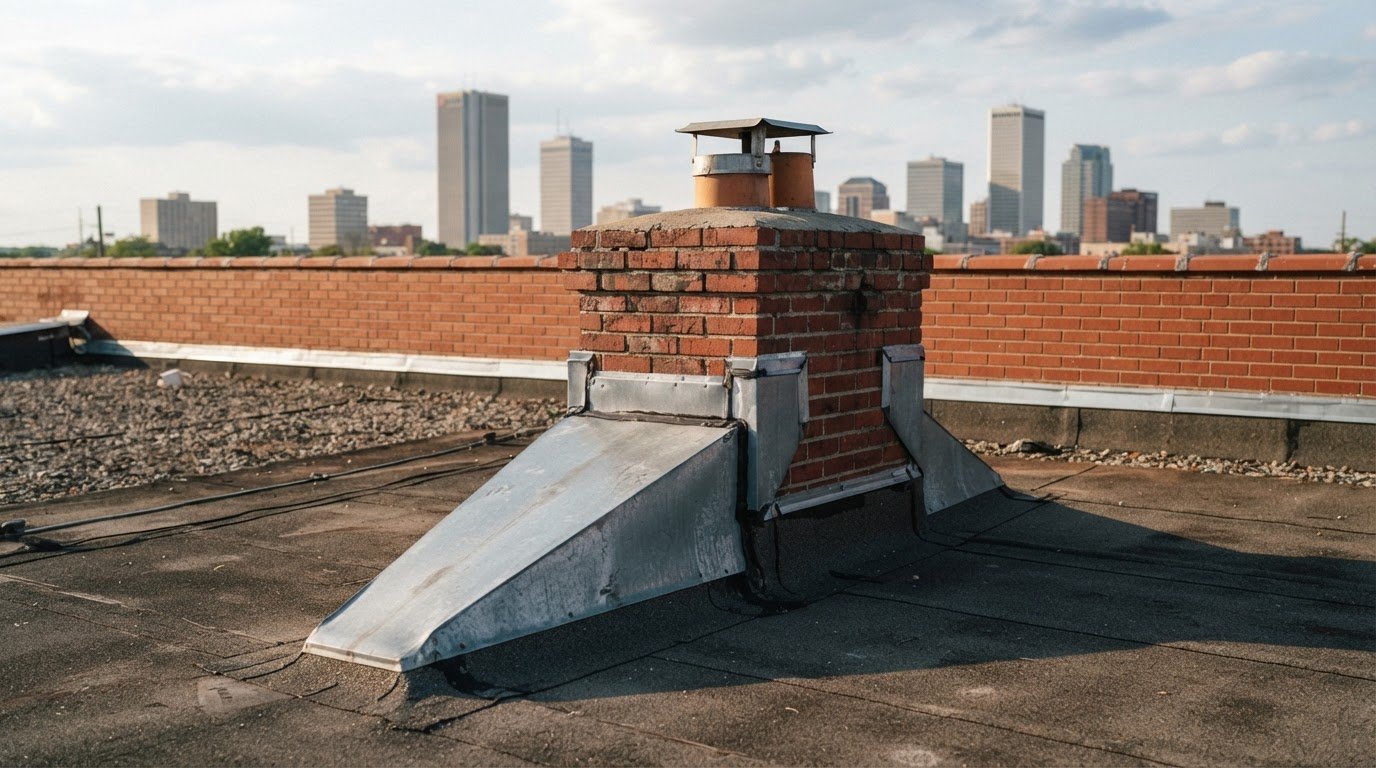

A roof opening is only as reliable as the detail that directs water around it. Commercial roof flashing details help protect penetrations and roof edges by covering vulnerable transitions and guiding water away from the building. Pipe vents, skylights, chimneys, walls, and edges call for different flashing arrangements, so a single detail will not suit every location.
Focus on both the material and the way flashing meets the roof. A piece that looks sound can still leave a vulnerable joint if its dimensions, seams, or connection to the roofing system do not suit the location. This guide explains what commercial roof flashing does, which penetrations need it, and how common flashing types, dimensions, and material thicknesses differ. It also covers why metal compatibility and the design of each roof transition matter when assessing flashing details.
Key Takeaways
- Understand how chimney flashing and back-of-chimney water diversion help guide water away from vulnerable roof transitions.
- See how metal thickness, seam dimensions, and material compatibility affect flashing selection.
- Identify common roof penetrations, including pipes, vents, and skylights, that need flashing suited to the roofing system.
- Compare flashing types for walls, skylights, and penetrations to understand why the right detail depends on the location.
What is commercial roof flashing and do I need to know?
Flashing covers roof openings and transitions, directing rainwater away from vulnerable joints. Commercial roof flashing details show how these areas connect to the roof’s drainage path.
Flashing’s Role in Water Protection
Flashing is a protective layer fitted where roofing meets an opening, wall, or edge. It guides water onto the roof’s drainage path instead of letting it enter seams or the building. The U.S. Environmental Protection Agency says roofing and exterior-cladding penetrations must be detailed to prevent rainwater intrusion. For example, flashing around a pipe closes a break in the roof surface.
Chimney Counterflashing and Water Diversion
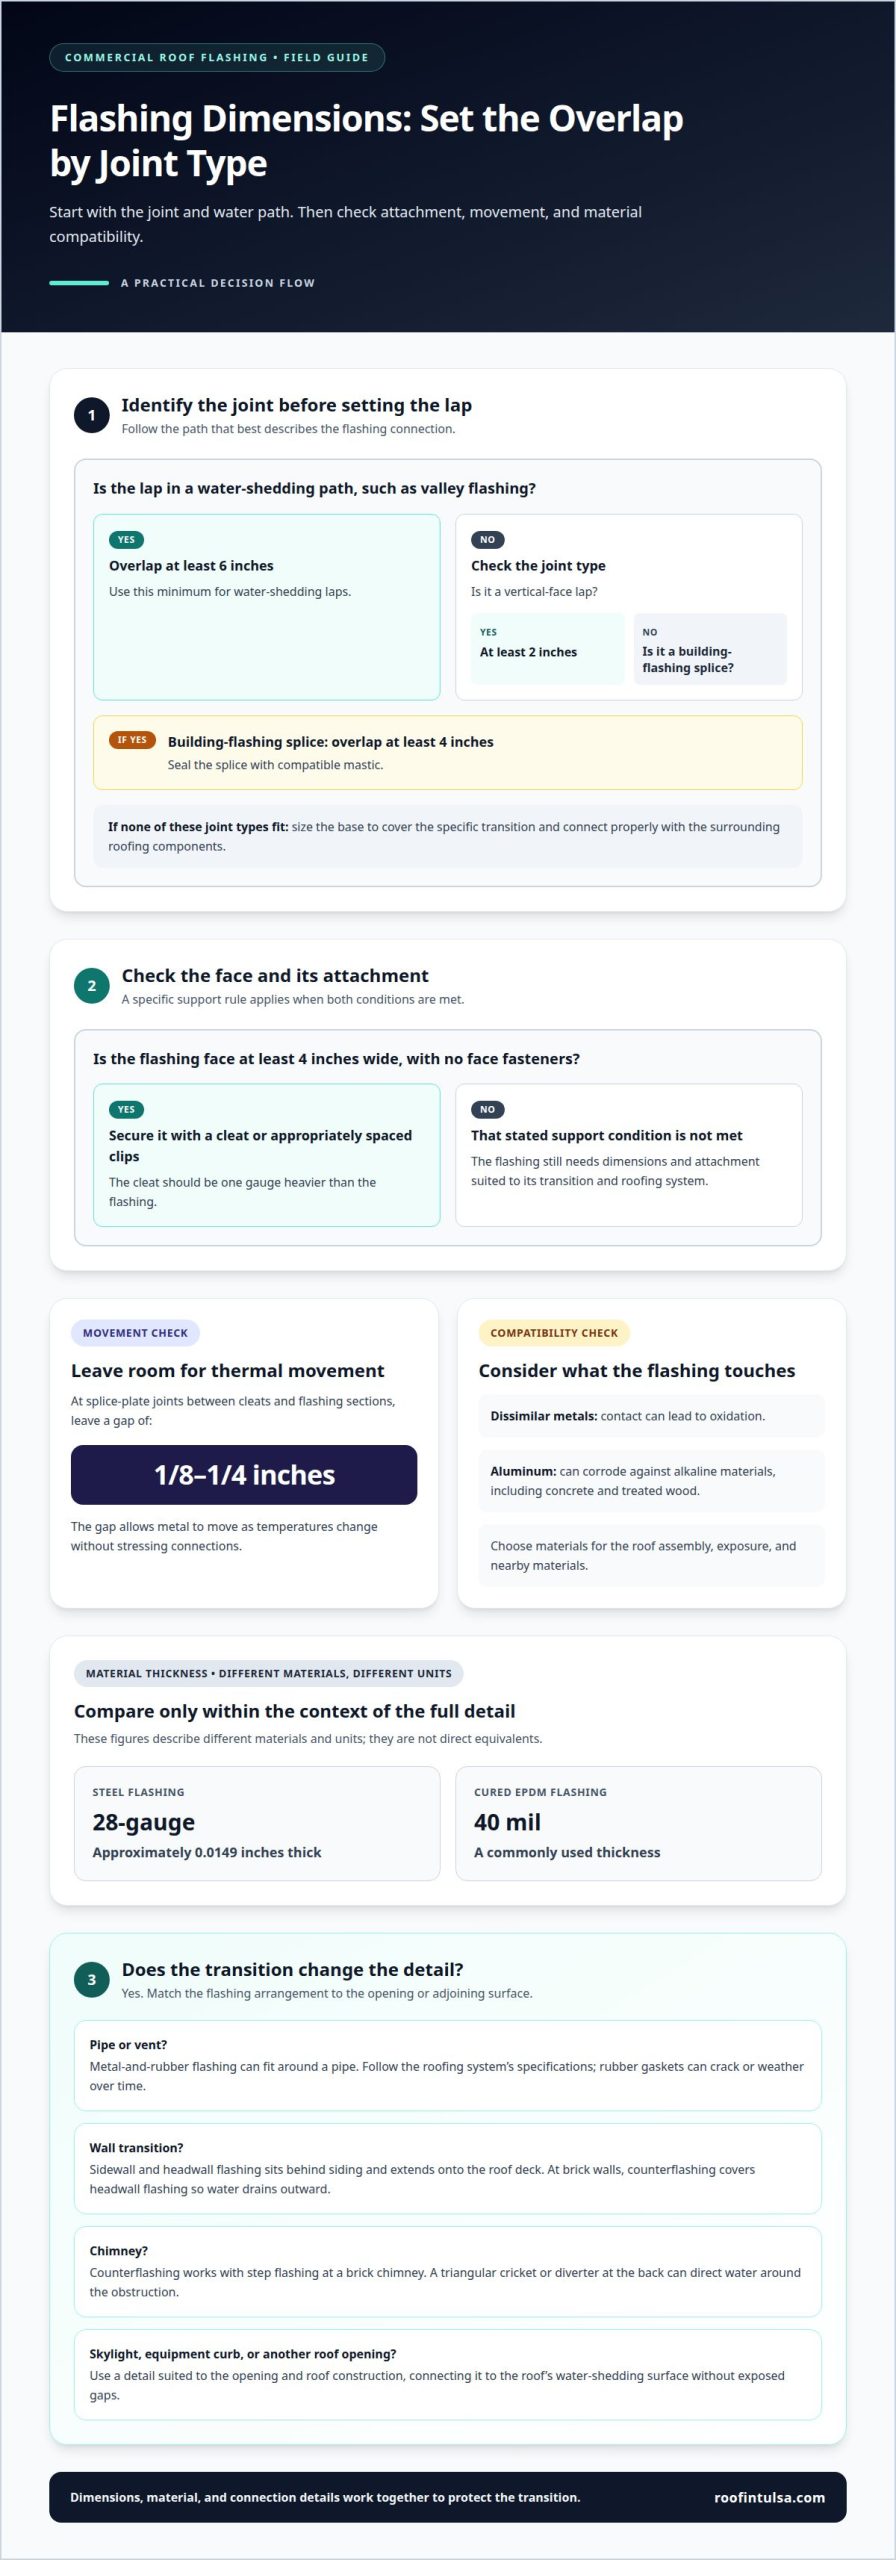
Chimney counterflashing is custom-fabricated metal, often L-shaped, placed where the chimney and roof deck meet. On a brick chimney, it works with step flashing to protect the roof-to-chimney junction. At the chimney’s back, a triangular cricket or diverter can direct water around the obstruction instead of letting it collect. This detail helps protect the junction between masonry and roofing.
Applicable Building and Trade Requirements
IBC and IECC provisions depend on the codes adopted by the local jurisdiction and the project’s conditions. SMACNA guidance can inform sheet-metal flashing workmanship, but the applicable details depend on the roof assembly and governing requirements. The project’s location and roofing system shape the required approach.
There is no single cost per linear foot for every flashing installation or repair. Cost depends on the material, access, roof construction, and whether damaged roofing also needs attention. A quote provides project-specific pricing.
Leak Causes and Prevention
Common leak causes include improper installation, defects, damage, and reused flashing. A professional inspection should examine seams, penetrations, chimney transitions, and signs of lifted or deteriorated material. Repair addresses the leak source and damaged components, while ongoing maintenance helps catch changes early. In high-wind, heavy-rain, or snow-prone areas, commercial roof flashing details should suit the roof system, secure transitions, and preserve clear water-shedding paths.
Metal flashing dimensions and material thickness
Flashing dimensions and material thickness work together to cover roof transitions and accommodate movement. The right measurements help protect seams from water infiltration and material stress.
Sizing Flashing Components
Metal flashing dimensions include face width, lap length, and the space allowed between joined components. A face at least 4 inches wide without face fasteners should be secured with a cleat or appropriately spaced clips. Cleats should be one gauge heavier than the flashing. Vertical-face lap seams should overlap at least 2 inches, while water-shedding laps, such as valley flashing, should overlap at least 6 inches.
Splices in building flashing should overlap at least 4 inches and be sealed with compatible mastic. These measurements help create continuous coverage rather than exposed joints where water can collect.
Flashing Base Size
Flashing base size is the amount of material extending across the roof or adjoining surface. It must provide enough coverage for the specific transition and connect properly with surrounding roofing components. For example, a wall detail needs flashing that directs water onto the roof, while a valley detail needs sufficient overlap along its water-shedding path.
Thermal movement matters at joints. Splice-plate joints between cleats and flashing sections should leave a gap of 1/8-1/4 inches, allowing the metal to move as temperatures change without stressing connections.
Choosing Flashing Materials and Thickness
Material choice depends on the roof assembly, exposure, and contact with nearby materials. Dissimilar metals can oxidize when they touch, so compatible combinations help limit corrosion. Aluminum can corrode against alkaline materials, including concrete and treated wood.
Thickness varies by material and application. 28-gauge steel flashing is approximately 0.0149 inches thick, while commonly used cured EPDM flashing is 40 mil thick. These figures describe different materials and units, so they aren’t direct equivalents. Select thickness and material as part of the full roof detail, considering how the flashing meets adjacent surfaces and how its joints allow movement.
What roof penetrations require flashing?
Every roof opening or transition, including pipes, vents, skylights, walls, and equipment curbs, needs a detail suited to the roofing system. Flashing should connect the opening to the roof’s water-shedding surface without leaving exposed gaps.
Weatherproofing Penetrations and Structural Changes
Flashing weatherproofs roof penetrations and structural changes by closing vulnerable transitions around openings and raised features. A skylight, new curb, or relocated pipe changes the roof surface, so its flashing must work with the surrounding roofing system. This protects the connection from weather and helps keep water from reaching the roof assembly or interior. The specific detail depends on the opening and roof construction.
Counterflashing at Walls and Penetrations
At a wall transition, sidewall and headwall flashing sits behind the siding and extends onto the roof deck. This placement helps water shed from the wall onto the roof rather than enter the joint. Brick walls use a related layered approach: counterflashing covers headwall flashing so water continues to drain outward. These interfaces deserve attention because wall cladding and roofing meet at a vulnerable seam.
Pipe and Vent Penetrations
Pipe and vent flashing can combine metal with a rubber component shaped around the pipe. The assembly must follow the roofing system’s specifications, so the materials and connection suit the roof surface. Rubber gaskets around these penetrations can crack or weather over time. That deterioration can open a path for water, making the gasket and surrounding flashing important parts of the roof detail.
Details for Curbs and HVAC Equipment
Curbs supporting HVAC equipment create raised roof transitions that need flashing integrated with the roofing system. The detail must cover the curb-to-roof connection and direct water away from the equipment opening. Skylights offer another example: they may be deck-mounted directly to the roof deck or curb-mounted on a raised box. Skylight areas are moisture-wrapped before metal flashings are installed, helping protect the surrounding assembly.
Commercial roof flashing product types
For TPO, PVC, EPDM, modified bitumen, and metal roofs, flashing details must suit the roofing system and its materials. There is no interchangeable detail for every roof; transitions and connections vary by system.
Commercial roofing uses several flashing types, selected according to the location and the materials they meet. The key distinction is how each type handles a seam, penetration, or change in surface.
Sidewall and headwall flashing sits behind siding and extends onto the roof deck, directing water toward the roof drainage path. Skylight flashing is designed to shed water without relying on sealants that can deteriorate. At a skylight, the flashing arrangement must work with the opening and surrounding roof assembly.
Metal, composite, and elastomeric products serve different conditions. For brick veneer, composite flashing is more effective than elastomeric flashing across a cavity: sustained weight can make elastomeric material sag and eventually tear. Around penetrations made by anchors, thick elastomeric flashing seals better than composite flashing. The substrate and type of opening therefore guide the choice.
Some details combine materials. No-caulk pipe flashing uses a rain collar, available in multiple sizes for different pipe diameters. Lead flashing is flexible and durable, but it presents health dangers and should be used correctly. Material compatibility matters, too: composite flashing placed on a metal drip edge needs a rubber or composite separator from the steel shelf angle to reduce corrosion risk.
These examples show why a product name alone doesn’t determine the right detail. The roofing membrane, penetration, adjoining materials, and water path all matter. For broader roof-system planning, discuss your commercial roof and its flashing transitions.
Flashing details must match the materials of each roofing system. Transitions and connections therefore differ, rather than relying on one interchangeable detail for all five roof types.
Rescue Roofing Tulsa: Commercial Roof Replacement
Rescue Roofing Tulsa provides commercial roof replacement when flashing issues point to broader roof wear or recurring problems across the roofing system. If damage appears limited to a seam or penetration, roof repair may address the affected area. A roof inspection can help assess the condition and scope of the concern.
During a replacement, the roof assembly and its transitions are considered together, including edges, walls, and penetrations. That broader view matters when isolated repairs no longer address the roof’s needs. For a building with localized damage, repair may be the more appropriate next step. The right service depends on the condition and extent of the roofing concerns.
Plan the Next Step for Your Roof
Use concerns about commercial roof flashing details as a reason to consider the roof’s broader condition and maintenance needs. Recurring leaks, visible damage, or planned building changes can affect whether a focused repair or a larger roofing project makes sense. Sharing where the issue appears and when it occurs can help frame the assessment.
Rescue Roofing Tulsa offers commercial and residential roof replacement, along with roof repair. The right path depends on the building and the condition of its roof. Repair may suit a localized concern, while replacement addresses a broader project. Taking the next step can help you make a clear, informed plan to protect the property.
Contact Rescue Roofing Tulsa today to discuss your roofing needs. A straightforward conversation is a good place to begin, and you can move forward with a plan that fits your building.
Frequently Asked Questions
Why does roof flashing matter to me as a business owner?
Roof flashing helps keep water from entering at vulnerable roof joints, reducing the risk of leaks reaching ceilings, insulation, or interior spaces. For example, a damaged seal around a roof pipe can let water travel beyond the visible opening. Flashing condition also matters when planning roof work, since repairs or replacement may need to address related transitions, not just the spot where water appears.
What are the main types of flashing used on commercial roofs?
Common types include edge flashing, wall flashing, chimney flashing, pipe boots, skylight flashing, and coping for parapet walls. Their roles differ: edge metal finishes a roof boundary, while a pipe boot fits around a pipe. Material choices vary, too. For example, pipe flashing may combine metal and rubber, while composite flashing can suit a brick-veneer cavity. The roof system and transition shape guide the selection.
How are parapet wall and roof-edge flashing details designed and installed?
Parapet walls are capped with coping that sheds water over the wall’s exterior surfaces. U.S. building code Section 1503.3 requires parapets to be coped with noncombustible, weatherproof material at least as wide as the wall is thick. At roof edges, metal flashing must connect securely with the roof assembly and accommodate movement. Cleats or clips can secure qualifying flashing without face fasteners.
What are standard commercial roof flashing dimensions, overlaps, and fastening requirements?
Dimensions depend on the location and roofing assembly, but common metal details use specific minimums. Vertical-face lap seams overlap at least 2 inches; water-shedding seams, such as valley flashing, overlap at least 6 inches. A face at least 4 inches wide without face fasteners uses a cleat or appropriately spaced clips. Cleats should be one gauge heavier than the flashing, and splice joints allow room for thermal movement.