


The thought of a full roof replacement can be overwhelming. Between the potential cost, the disruption to your daily life, and the stress of finding an honest team for the job, it’s easy to feel anxious before the project even begins. But the process doesn’t have to be a mystery. A professional roofing contractor should provide a clear, transparent plan that gives you peace of mind, not more worries.
That’s why we’ve created this step-by-step guide. We believe an informed homeowner is a confident homeowner. We’ll walk you through the entire roof replacement process, from the initial inspection and material delivery to the final cleanup and walkthrough. By the end, you’ll know exactly how to prepare your property and what to expect from your crew, ensuring a smooth, stress-free experience that protects your biggest investment.
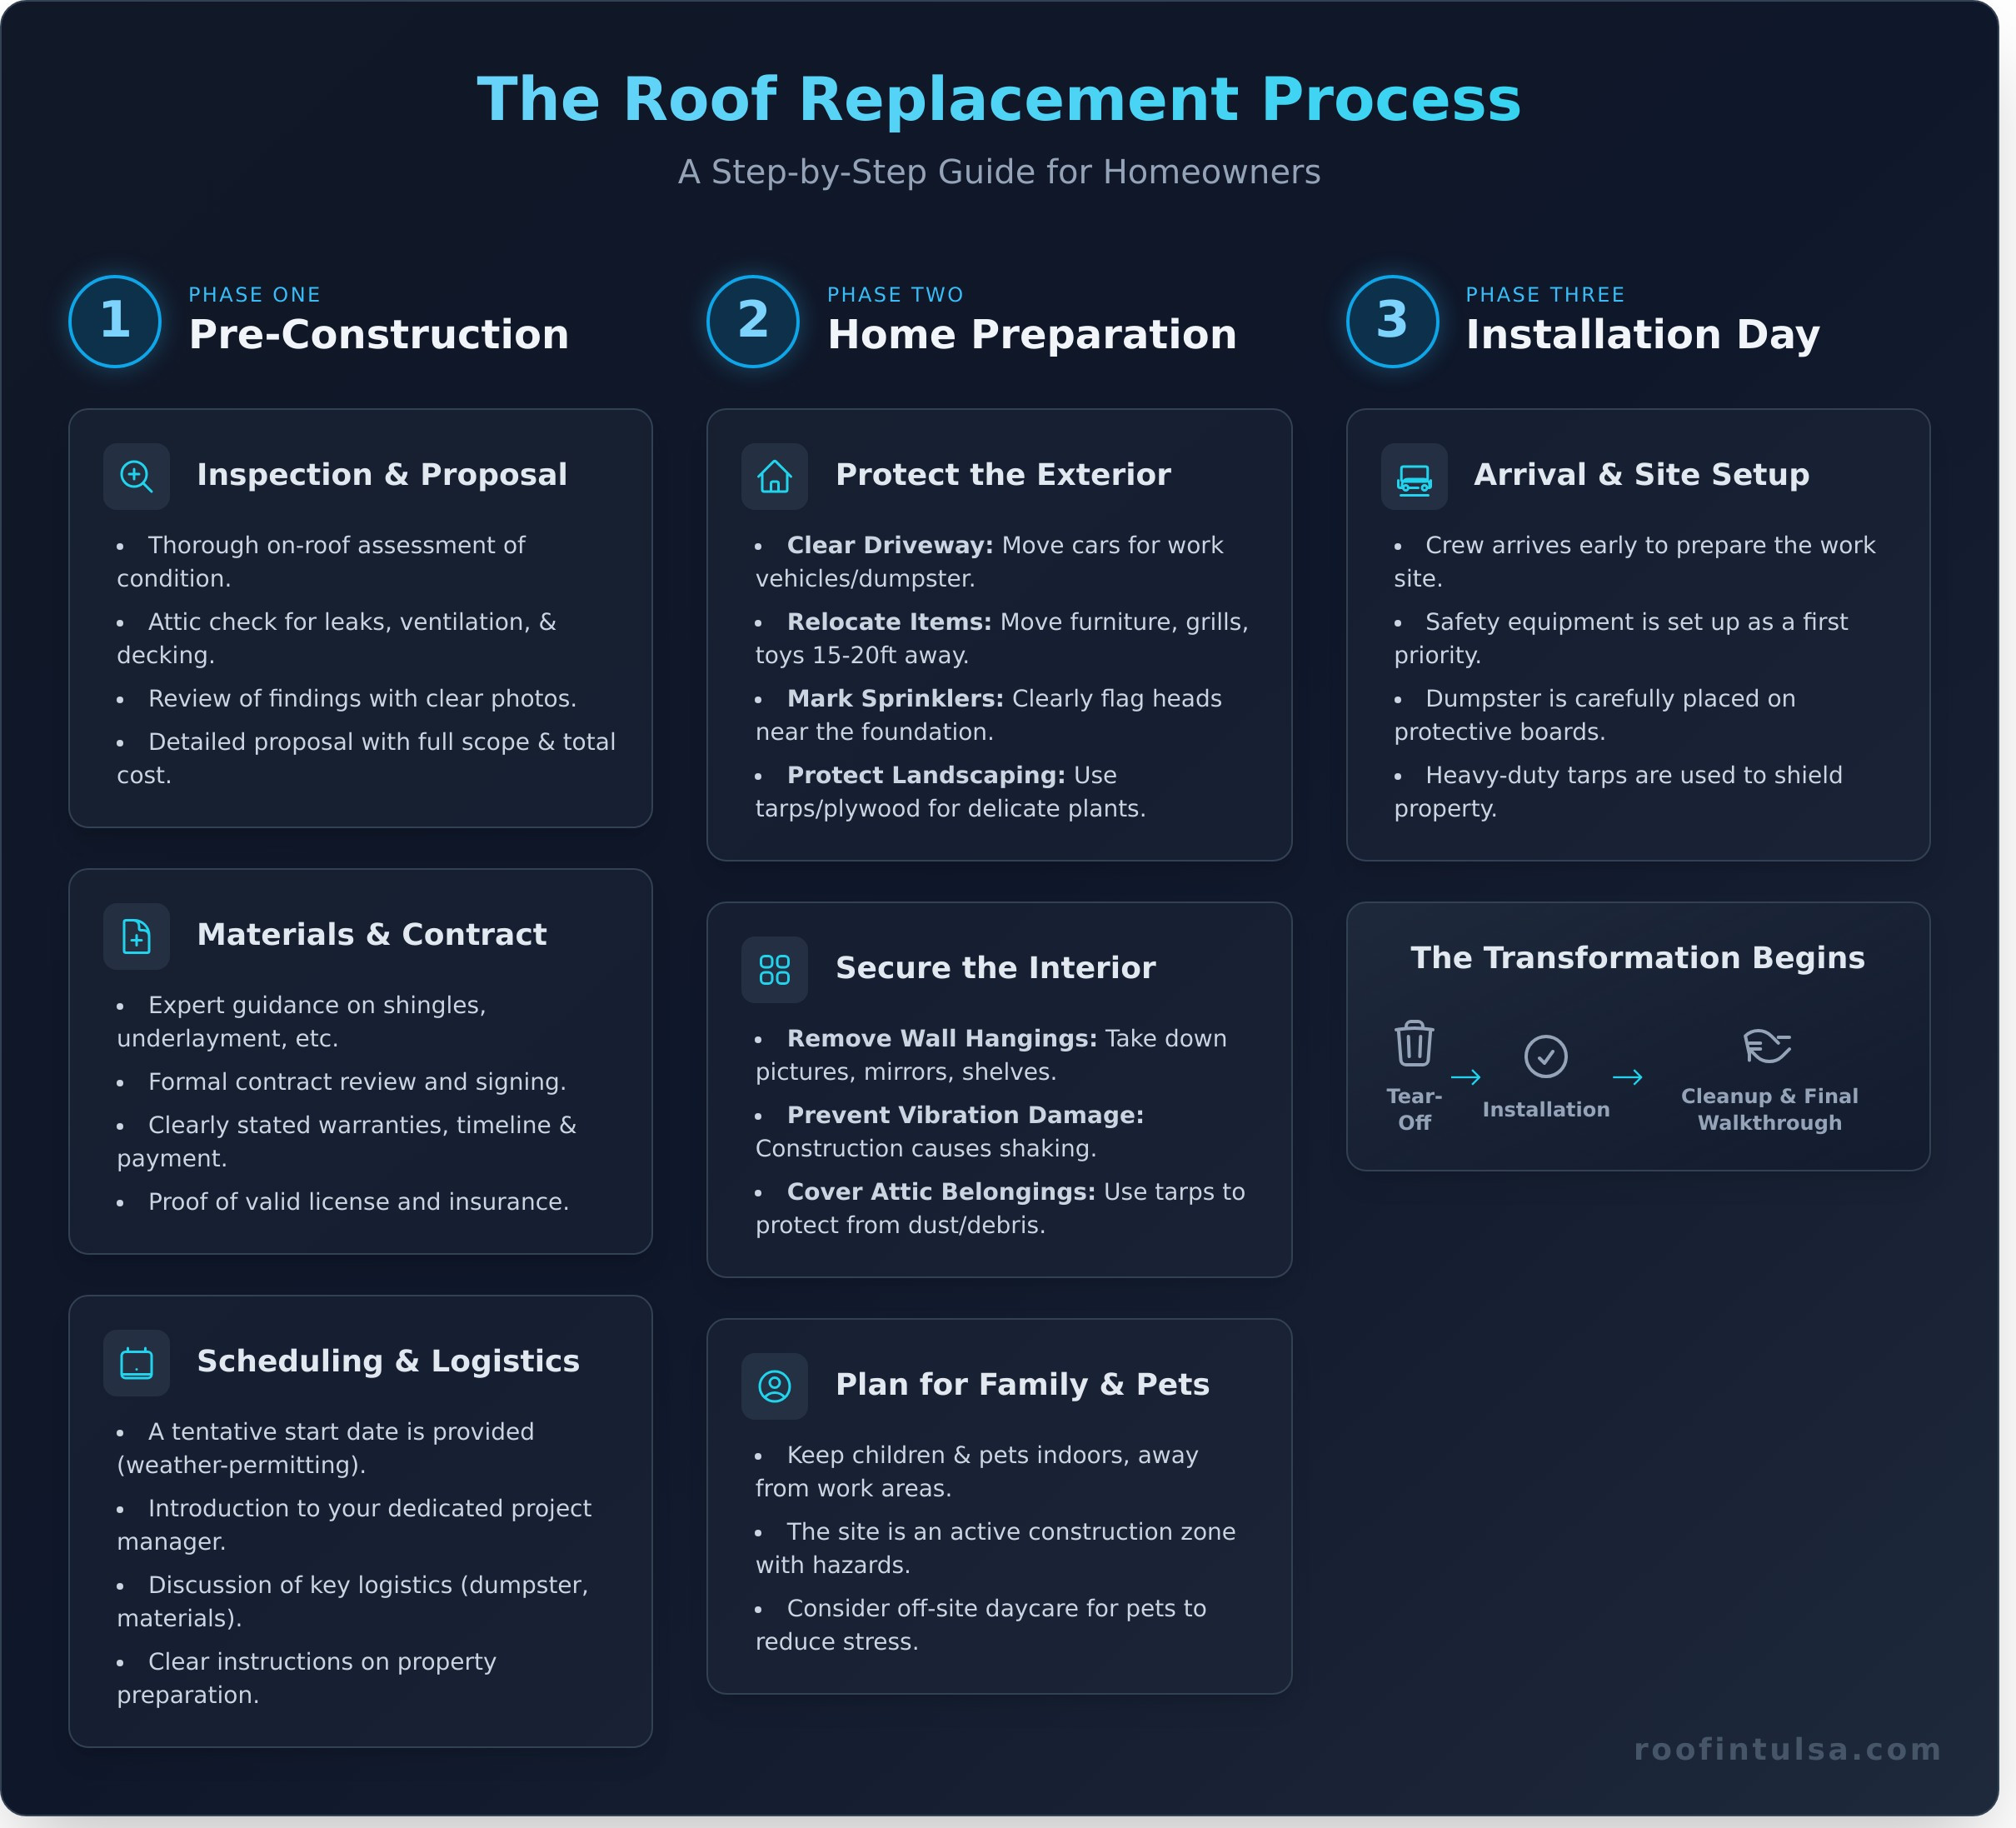
Phase 1: The Pre-Construction Process with Your Roofing Contractor
A successful roof replacement begins long before the first shingle is removed or the first nail is hammered. This initial phase is all about establishing clear communication, detailed planning, and transparent paperwork. A professional roofing contractor understands that your peace of mind is paramount, ensuring you feel informed, confident, and prepared from day one. This critical groundwork sets the foundation for a smooth, predictable, and stress-free project.
Initial Inspection and Detailed Proposal
The process starts with a comprehensive assessment of your roof’s condition. This isn’t just a quick glance from the ground; a thorough inspection includes getting on the roof to check for damage and examining the attic for signs of leaks, inadequate ventilation, or compromised decking. Your contractor should then walk you through their findings using clear language and photos, so you see exactly what they see. Afterward, you will receive a detailed, written proposal that outlines the full scope of work, the specific materials to be used, and a transparent total cost-no surprises.
Material Selection and Contract Signing
Choosing the right materials is about more than just color. Your contractor will act as a trusted advisor, guiding you through options for shingles, underlayment, and ventilation that fit your home’s style, budget, and the demands of the Tulsa climate. Understanding the basic components of roof construction helps you appreciate these recommendations. Before work begins, you’ll review a formal contract. Be sure it clearly states:
- Workmanship and material warranties
- A projected timeline
- A clear payment schedule
- Proof of license and insurance valid in Tulsa, OK
A clear, comprehensive contract is a sign of a professional company and protects both you and your contractor.
Scheduling and Pre-Job Communication
Once the contract is signed, the final planning stage begins. Your roofing contractor will provide a tentative start date, keeping in mind that weather can play a significant role in scheduling. They will introduce you to your project manager or main point of contact, giving you a direct line for any questions. You’ll also discuss key logistics, such as where the dumpster will be placed, when materials will be delivered, and how to prepare your property to ensure the project runs efficiently and safely from start to finish.
Phase 2: How to Prepare Your Home and Property
Once you’ve selected your materials and scheduled your project, a little preparation can make a significant difference in ensuring the entire process is smooth and hassle-free. Taking a few simple steps to prepare your home and property helps protect your belongings and minimizes disruption to your daily life. A professional roofing contractor should provide you with a similar checklist, but being proactive gives you valuable peace of mind.
Focus on the areas immediately surrounding your house, as well as the rooms directly below the roofline.
Protecting the Exterior of Your Home
Your home’s exterior will be the center of activity. To prevent accidental damage and give the crew the space they need to work safely and efficiently, we recommend taking these steps:
- Clear Your Driveway: Your crew will need space for work vehicles and a dumpster for old roofing materials. Please move all cars from the driveway and onto the street if possible.
- Relocate Outdoor Items: Move any potted plants, patio furniture, grills, toys, and lawn ornaments at least 15-20 feet away from the house to protect them from falling debris.
- Mark Sprinkler Heads: If you have a sprinkler system, mark any heads near the foundation so our team can easily see and avoid them.
- Protect Landscaping: Discuss any delicate flower beds or special landscaping with your project manager. We can use tarps and plywood to provide extra protection for your prized plants.
Securing the Interior of Your Home
A roof replacement is a major construction project that creates strong vibrations throughout your home’s structure. To prevent items from rattling off shelves or walls, it’s wise to secure the interior. Following these simple steps, which align with best practices from industry leaders like the National Roofing Contractors Association, ensures your valuables stay safe.
- Remove Wall Hangings: Take down pictures, mirrors, shelves, and other valuables from exterior walls and high shelves. The vibrations can easily knock them loose.
- Cover Attic Belongings: During the tear-off phase, small amounts of dust and debris can fall into attic spaces. Cover any stored items with tarps or old sheets for easy cleanup.
Planning for Children and Pets
Your family’s safety is the top priority. A roof installation site is an active construction zone with potential hazards like falling debris and nails. A reliable roofing contractor will prioritize a safe work environment, but it’s essential to plan ahead.
Please keep children and pets indoors and away from the work area at all times. The constant noise and activity can also be very stressful for animals, so consider arranging for them to stay with a friend or at a daycare for the day. Be sure to communicate your plans with your project manager so everyone is on the same page.
Phase 3: The Day-of Roof Replacement Process
After the planning and preparation, installation day is where the real transformation happens. While it can seem like a whirlwind of activity, a professional roofing contractor ensures the entire process is systematic and efficient. Understanding the key stages of the replacement can provide significant peace of mind, turning potential anxiety into excitement as you watch your new roof take shape. Seeing the process firsthand helps you appreciate the quality and care that goes into protecting your home. See our work in action by viewing our project gallery.
Arrival, Site Setup, and Property Protection
Your trusted crew will arrive early to begin preparing the site. The first priority is safety and protecting your property. This involves setting up safety equipment, carefully placing a dumpster (often on protective boards to prevent driveway damage), and laying large, heavy-duty tarps over landscaping, siding, and windows. This initial step is a clear sign of a respectful and professional team that values your home as much as you do.
Tear-Off and Decking Inspection
Next comes the tear-off, which is often the loudest and messiest part of the day. The team will systematically remove all old shingles and roofing materials, exposing the underlying wood decking. This is a critical step, as it allows for a thorough inspection of the decking for any signs of rot, water damage, or weakness. Any compromised boards will be replaced to ensure the new roof has a solid and secure foundation.
Installation of the New Roofing System
With a clean and solid deck, the installation of your new roofing system begins. This is a multi-layered process that guarantees long-term protection for your home. The key steps include:
- Underlayment and Shields: A synthetic underlayment is installed over the entire roof deck, and a specialized ice and water shield is applied to vulnerable areas like eaves and valleys.
- New Flashing: All-new metal flashing is installed around chimneys, vents, and in valleys to prevent water intrusion at these critical points.
- Shingle Installation: Your chosen shingles are installed with precision, following the manufacturer’s exact specifications to ensure maximum performance and warranty compliance.
- Finishing Touches: Finally, ridge caps are installed along the peaks of the roof, and proper ventilation systems are put in place to complete the project.
Phase 4: Site Cleanup and Project Completion
Once the last shingle is in place, the work is far from over. The final and most crucial sign of a professional job is how a roofing contractor treats your property upon completion. A truly exceptional team understands that the project isn’t finished until your home and yard are spotless. This final phase is about more than just hauling away trash; it’s a demonstration of respect, integrity, and a commitment to leaving your home better than they found it.
Thorough Debris Removal
A systematic and meticulous approach to debris removal is essential. Your contractor’s crew will ensure every piece of old roofing material and construction waste is properly handled. This includes:
- Loading all old shingles, underlayment, and large debris directly into the designated dumpster.
- Carefully folding and rolling up protective tarps to contain smaller debris like shingle granules and nails.
- Clearing gutters of any granules, nail heads, or shingle fragments to ensure they function correctly.
- Arranging for the dumpster to be removed from your property promptly after the job is complete.
Detailed Ground-Level Cleanup
The cleanup process extends well beyond the roofline. The crew should conduct a final, detailed sweep of your entire property to guarantee it’s safe and immaculate. This involves using powerful magnetic rollers across your lawn, driveway, and garden beds to find and collect stray nails-a critical step for the safety of your family, pets, and vehicle tires. Any patio furniture, potted plants, or other items that were moved for safety will be carefully returned to their original positions.
Final Walkthrough with Your Contractor
Before the team packs up for good, you should have a final walkthrough with the project manager. This is your dedicated time to inspect the new roof, review the cleanup, and ask any remaining questions. The goal of this meeting is your complete satisfaction. Walk the perimeter of your home, look at the details, and point out anything that concerns you. A trustworthy contractor will welcome your feedback and address any issues immediately. The final payment is typically exchanged only after you have given your full approval, ensuring you have total peace of mind in your investment.
This commitment to a flawless finish is what sets a great roofing experience apart. To learn more about our hassle-free process, explore the services we offer at roofintulsa.com.
Phase 5: Post-Project Follow-Up and Warranty
A great roofing contractor’s service doesn’t end once the final nail is driven and the cleanup is done. In fact, this final phase is one of the most important for your long-term peace of mind. The post-project follow-up is where a truly professional company ensures your investment is protected, providing you with all the essential documentation and establishing a relationship built on trust and support.
Receiving Your Warranty Documents
You will receive two critical types of warranties, and a good contractor will take the time to explain the difference. Understanding what each one covers is key to your protection:
- Workmanship Warranty: This comes directly from your contractor and covers the quality of the installation itself. It’s their promise that the job was done right.
- Manufacturer’s Warranty: This is provided by the shingle manufacturer (like GAF) and covers defects in the roofing materials.
Be sure to store these important documents in a safe place with your other home records.
Final Paperwork and Insurance Claims
Along with your warranties, you will receive a final invoice clearly marked ‘paid in full’. This is your official receipt and a crucial document for your records. If your roof replacement was part of an insurance claim, the process doesn’t have to be complicated. Your contractor should provide all the final documentation your insurer needs to close the file. At T-Town Roofing, we help you submit everything correctly, ensuring a smooth and genuinely hassle-free claims process.
Ongoing Support and Maintenance
The best sign of a quality local company is their commitment to a long-term relationship. Your roofing contractor should be more than just an installer; they should be a trusted advisor for the life of your roof. Feel free to ask about recommended maintenance schedules or future inspections to keep your roof in peak condition, especially given Tulsa’s unpredictable weather. A company that welcomes these questions and stands by its work is one you can rely on for years to come. If you’re still evaluating your options, our guide to expert roofing contractors in Tulsa can help you understand what certifications, local experience, and insurance expertise to look for before making your decision.
A new roof is a significant investment in your home’s safety and value. Ensuring you have the right documentation and ongoing support is the final, crucial step. Have questions about the process or need to discuss your warranty? Contact our Tulsa roofing experts today!
Your Partner for a Seamless Roof Replacement
A full roof replacement is a significant investment in your home’s safety and value, but it doesn’t have to be a source of stress. The key takeaway is simple: a transparent, well-communicated process is essential. Knowing what to expect during each phase-from the initial consultation and property preparation to the final cleanup and warranty activation-empowers you as a homeowner. When you partner with the right roofing contractor, you can expect professionalism, respect for your property, and clear guidance from start to finish.
At T-Town Roofing, we are more than just contractors; we are your neighbors. As a local, family-owned Tulsa business, we are committed to providing an honest, high-quality experience. We specialize in navigating hassle-free insurance claims and back all our work with a comprehensive workmanship warranty for your lasting peace of mind. Your home is in trusted hands.
Ready for a stress-free roof replacement? Get your free, detailed estimate today!
Frequently Asked Questions About Roof Replacement
How long does a typical roof replacement take?
For an average-sized home, a complete roof replacement usually takes between one and three days. This timeline can be affected by factors like the roof’s size and complexity, the materials being installed, and of course, the weather. Our professional crew works efficiently to minimize disruption to your daily life. We provide a clear schedule before we begin so you know exactly what to expect from our team.
What happens if it rains in the middle of my roof replacement?
Your home’s protection is our top priority. Our team closely monitors the weather forecast and will not begin removing shingles if rain is likely. If an unexpected shower occurs mid-project, we immediately cover all exposed areas of your roof with heavy-duty tarps to ensure it is completely watertight. We take every precaution to keep your home and the new roofing structure safe and dry, giving you total peace of mind.
How loud is the roof replacement process really?
We believe in being honest and upfront: a roof replacement is a noisy job. You should expect to hear consistent sounds of hammering, scraping as old materials are removed, and the hum of air compressors. If you work from home, have napping children, or pets who are sensitive to loud noises, you may want to plan on being away from the house during peak work hours. This helps ensure your comfort while we work.
Will I need to be home while the roofing crew is working?
No, you do not need to be home while our crew is working. All the activity takes place on the exterior of your house. We simply ask for clear access to the property, such as the driveway, and access to an outdoor electrical outlet. Your dedicated project manager will provide you with regular updates throughout the day via phone or text, ensuring a smooth and hassle-free process that respects your schedule.
What is the difference between a material warranty and a workmanship warranty?
This is a critical distinction for your protection. A material warranty is provided by the shingle manufacturer (like GAF) and covers defects in the product itself. A workmanship warranty is provided by us, your roofing contractor, and it covers the quality of the installation. A great product can fail if installed incorrectly, which is why our workmanship warranty is your guarantee of a durable, long-lasting roof and true peace of mind.
How do I know if the wood decking under my old shingles needs to be replaced?
The condition of your roof’s decking can only be fully evaluated after the old shingles have been removed. Our team will carefully inspect the wood for any soft or spongy spots, water damage, or rot. If we identify any compromised sections, we will show you the issue and discuss the necessary repairs before moving forward. Ensuring your decking is solid is a critical step for the structural integrity and longevity of your new roof. To learn more about how to choose qualified roofing contractors in Tulsa who will handle every detail with care, explore our comprehensive local guide.